In short
The MyParcel plugin connects your WooCommerce shop to MyParcel. Customers pick a delivery moment or pickup point in the checkout, you print labels from WordPress, and Track & Trace is sent to the customer automatically. No code needed — everything runs from the WordPress admin.
Quickstart — your first parcel in 15 minutes
Enough to ship your first real order today. For deeper configuration, see Looking for… below.
- Account. Don't have a MyParcel account yet? Create one at myparcel.nl/register.
- Copy the API key. Log in to backoffice.myparcel.nl → Shop settings → Integration → copy the API key.
- Install the plugin. In WordPress: Plugins → Add new plugin → search MyParcel → Install now → Activate.
- Connect the plugin. Open WooCommerce → MyParcel, click Change API key, paste the key and click Save. The status badge should show Connected to MyParcel.
- First label. Open a paid order, scroll to the MyParcel block and click Export and print. Your PDF label rolls out.
You're done when you see this
- At the top of the plugin: a green Connected to MyParcel status
- You can export a test order to MyParcel
- Your PDF label opens (or lands in your downloads folder)
Looking for…
| What do you want to do? | Go to |
|---|---|
| First-time setup | Quickstart |
| Also connect from the backoffice (sales channel) | Sales channel via the MyParcel Backoffice |
| Recommended settings for your type of shop | 4 · Which shop profile are you? |
| Look up a specific setting | 5 · Settings · Orders to 9 · Settings · Carriers |
| A different setting per product | 10 · Product settings |
| What the customer sees in the checkout | 13 · The checkout experience |
| Bulk processing for 50+ orders/day | 14 · Daily use |
| Something's not working | 15 · Something's not working — diagnostics |
| Answer to a frequently asked question | 16 · FAQ |
1 · Preparing your MyParcel account
Before you start in WooCommerce, take care of four things in your MyParcel backoffice:
- Billing and return address — Shop settings → General. This appears on every label.
- Activate carriers — Shop settings → Carriers. Only enabled carriers appear in the plugin later.
- Generate an API key — Shop settings → Integration.
- Import order information (optional) — turn on if you want to use order mode.
2 · Installing the plugin
- In the WordPress admin: Plugins → Add new plugin.
- Search MyParcel.
- Find WooCommerce MyParcel and click Install now, then Activate.
- A new menu item WooCommerce → MyParcel appears.
Prefer to install manually?
Download the release ZIP from github.com/myparcelnl/woocommerce/releases and upload it via Plugins → Add new plugin → Upload plugin.
Sales channel via the MyParcel Backoffice
Before you set this up
A sales channel is optional and is not available on every account yet. The plugin works without one. A sales channel adds direct order sync on top, and in some situations it can create duplicate orders — see 14 · Daily use for how to prevent that.
As well as connecting the plugin with your API key (see Connecting the plugin), you can also register WooCommerce as a Sales channel in your MyParcel backoffice. The plugin handles the WooCommerce checkout and settings, while the sales channel lets MyParcel talk to your shop directly over its REST API and import your orders.
What each connection does
- The plugin + API key (see Connecting the plugin) adds delivery options to the WooCommerce checkout and lets you manage shipping from WordPress.
- The Sales channel (this section) lets MyParcel pull your orders from WooCommerce directly and is managed from the backoffice.
Create the sales channel
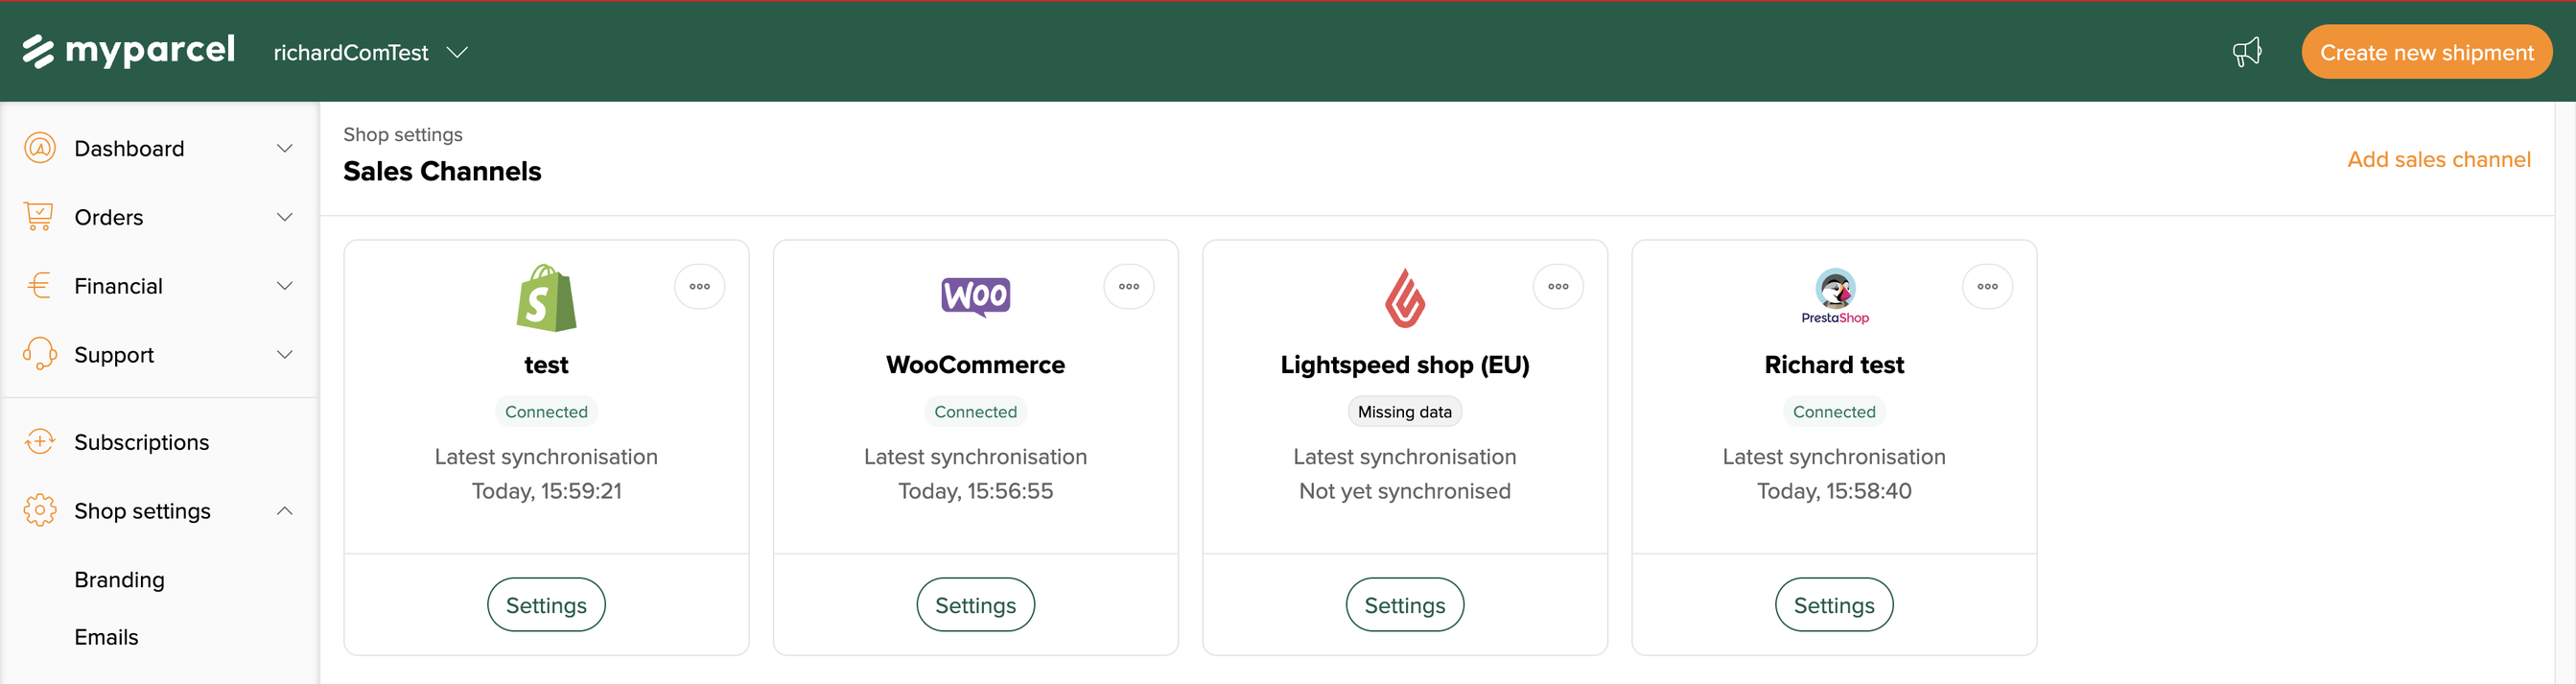
- Log in to backoffice.myparcel.com and go to Shop settings → Sales Channels.
- Click Add sales channel (top right).
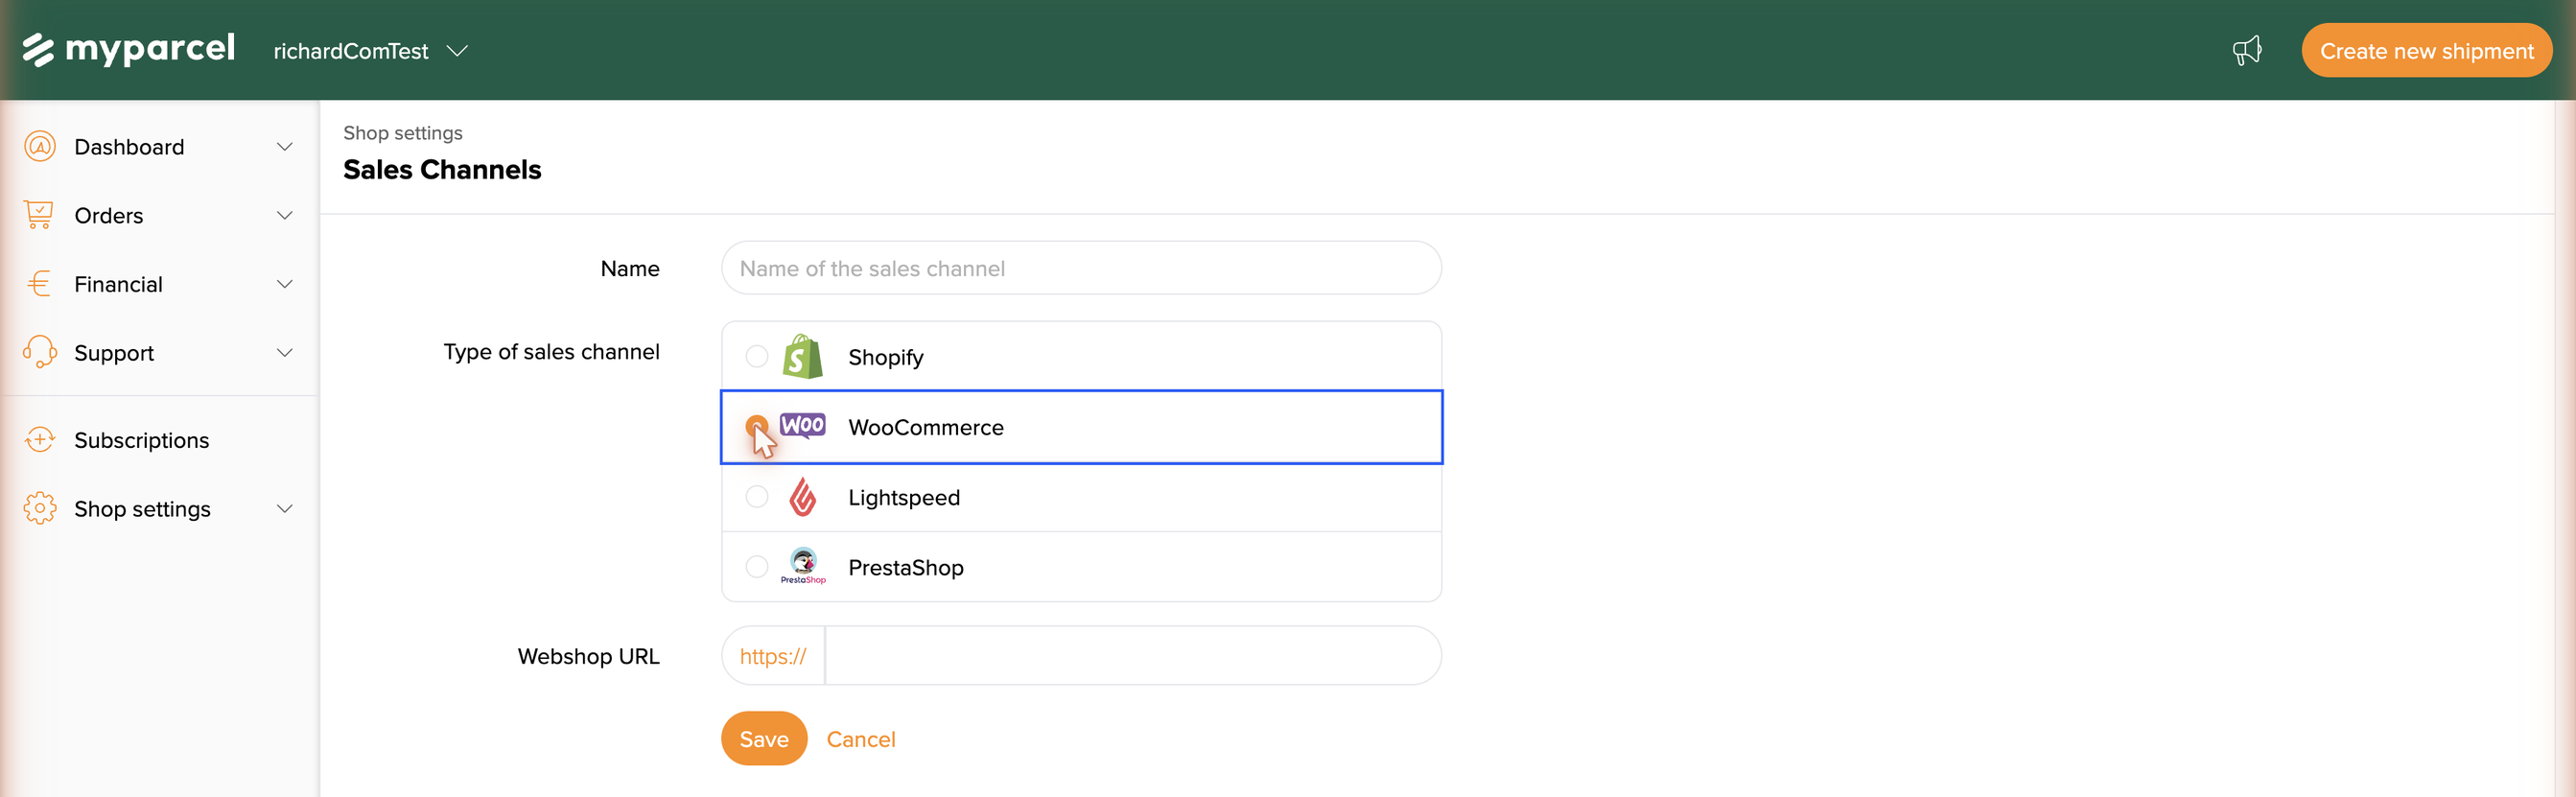
- Fill in a Name that helps you recognise the channel (e.g. My WooCommerce shop).
- Under Type of sales channel, choose WooCommerce.
- Fill in your Webshop URL — the address of your WooCommerce shop (for example
https://your-shop.com). - Click Save. The channel is created and shows a Missing data badge until you add the credentials.
Authenticate the channel (consumer key & secret)
WooCommerce lets MyParcel read your orders with a Consumer key and Consumer secret from its REST API.
- In your WooCommerce admin, go to WooCommerce → Settings → Advanced → REST API and click Add key. Give it a description, set Permissions to Read/Write and generate the key — WooCommerce shows the Consumer key and Consumer secret only once, so copy them now.
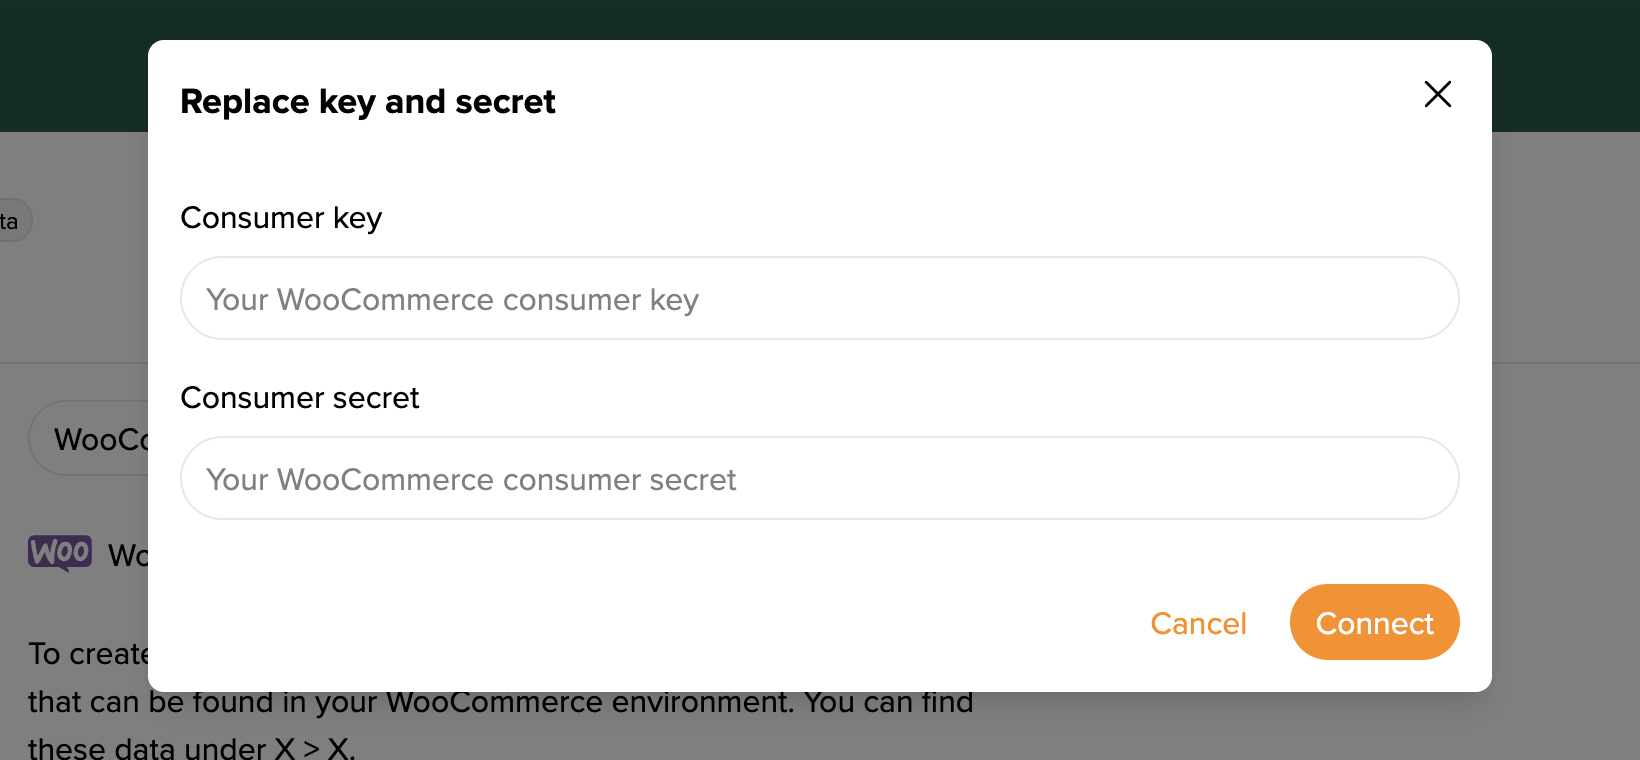
- Back in the backoffice, open the channel and click Set credentials.
- In the Replace key and secret dialog, paste the Consumer key and Consumer secret.
- Click Connect.
Once connected, the Missing data badge disappears, the channel shows Connected and MyParcel starts synchronising your WooCommerce orders.
Not connecting?
Most common causes: an extra space pasted with the key or secret · the REST API key was created with Read only instead of Read/Write · the Webshop URL points to a different shop or is missing https://.
What happens when you export a shipment
You can export and print a shipment from the order list or from the order detail page (§12). What you get in your MyParcel backoffice depends on what was there first — the shipment or the order.
| What you do | What happens in the backoffice |
|---|---|
| You export the shipment before the sales channel imported the order | One order, linked to your shipment, under Actief (Active) — without the optional metadata such as products (depending on account features), because the shipment already existed before the sales channel synced the order. |
| You export the shipment after the sales channel imported the order | Two orders: the imported order with its metadata, plus a second order from your export, under Actief (Active) and without metadata. |
| You export no shipment from the plugin | One order from the sales channel, under Te importeren (To import) or Actief (Active), depending on your settings in the backoffice. |
Do not export from the plugin
Using a sales channel? Create the shipment and print the label from the MyParcel backoffice. That is the only way to keep one order with all its data. See §14 · Daily use.
3 · Connecting the plugin (API key)
Open WooCommerce → MyParcel. At the top you'll see three buttons — Change API key, Change webhooks, Debug options — plus the status badge.
 The connection bar appears on every plugin page.
- Click Change API key.
- Paste the key from your MyParcel backoffice.
- Click Save — within seconds the status switches to Connected to MyParcel.
Not working?
Most common causes: didn't click Save · a space copied before/after the key · key from a different shop · plugin runs on a different environment (live vs sandbox) than your MyParcel account.
What does the plugin do in your WordPress admin?
| Where? | What can you do? |
|---|---|
| WooCommerce → MyParcel | Settings page with five tabs (Orders, Labels, Customs, Checkout, Carriers). |
| WooCommerce → Orders | Extra MyParcel column per order + bulk actions for exporting & printing. |
| Order detail page | MyParcel box to set carrier/package type/insurance per order and create labels. |
| Product detail page | MyParcel tab in Product data for product-specific settings. |
4 · Which shop profile are you?
Four typical profiles with recommended settings. Pick one, copy the settings, then fine-tune via 5 · Settings.
Small — a few orders per day, NL only
| Setting | Recommended | Why |
|---|---|---|
| Order mode | On | Full order to MyParcel |
| Concept shipments | On | Keeps you in control while you learn |
| Auto-process | None | Click Export yourself per order |
| Label format | A4 (4 per page) | No label printer needed |
| PostNL only | On | Standard NL carrier |
| Insurance — Insure from € | 250 | Parcels above €250 are insured automatically |
Busy shop — 50+ orders/day
| Setting | Recommended | Why |
|---|---|---|
| Concept shipments | Off | Faster — labels are final immediately |
| Auto-process | Processing | No more clicking per order |
| Label format | A6 (Zebra/Brother label printer) | Faster printing |
| Print immediately | On | Print flow without clicks |
| Bulk export | 2–3× per day | From the order list |
| Processing time | 2 days during peaks | Realistic window for the customer |
| PostNL + DHL For You | Both on | Broad coverage |
Mailbox-only — coffee, cards, cosmetics
| Setting | Recommended | Why |
|---|---|---|
Shipping class Mailbox | Create in WooCommerce → Shipping → Shipping classes | Link products to it |
| Checkout → Allowed shipping methods | Method → Mailbox parcel | One method per package type |
| Show delivery options | Off | No time slot for mailbox |
| Insurance | Off | Not available for mailbox parcels |
Expensive jewellery / high-value products
| Setting | Recommended | Why |
|---|---|---|
| Default signature | On | The courier asks the customer to sign |
| Default only recipient | On | No neighbours |
| Insurance | From €0, up to €2500, percentage 100% | Full coverage |
| Evening delivery + pickup points | Off | Reduces loss/theft |
| Separate address fields + Address widget | On | Minimises typos |
Shipping internationally
| Setting | Recommended | Why |
|---|---|---|
| Share customer information | On | Phone is required for customs |
| Customs tab | Fill in completely | HS code, country of origin, Goods |
| DHL Parcel Connect | On | For Europe |
| UPS / DHL Express | On | For worldwide |
5 · Settings · Orders
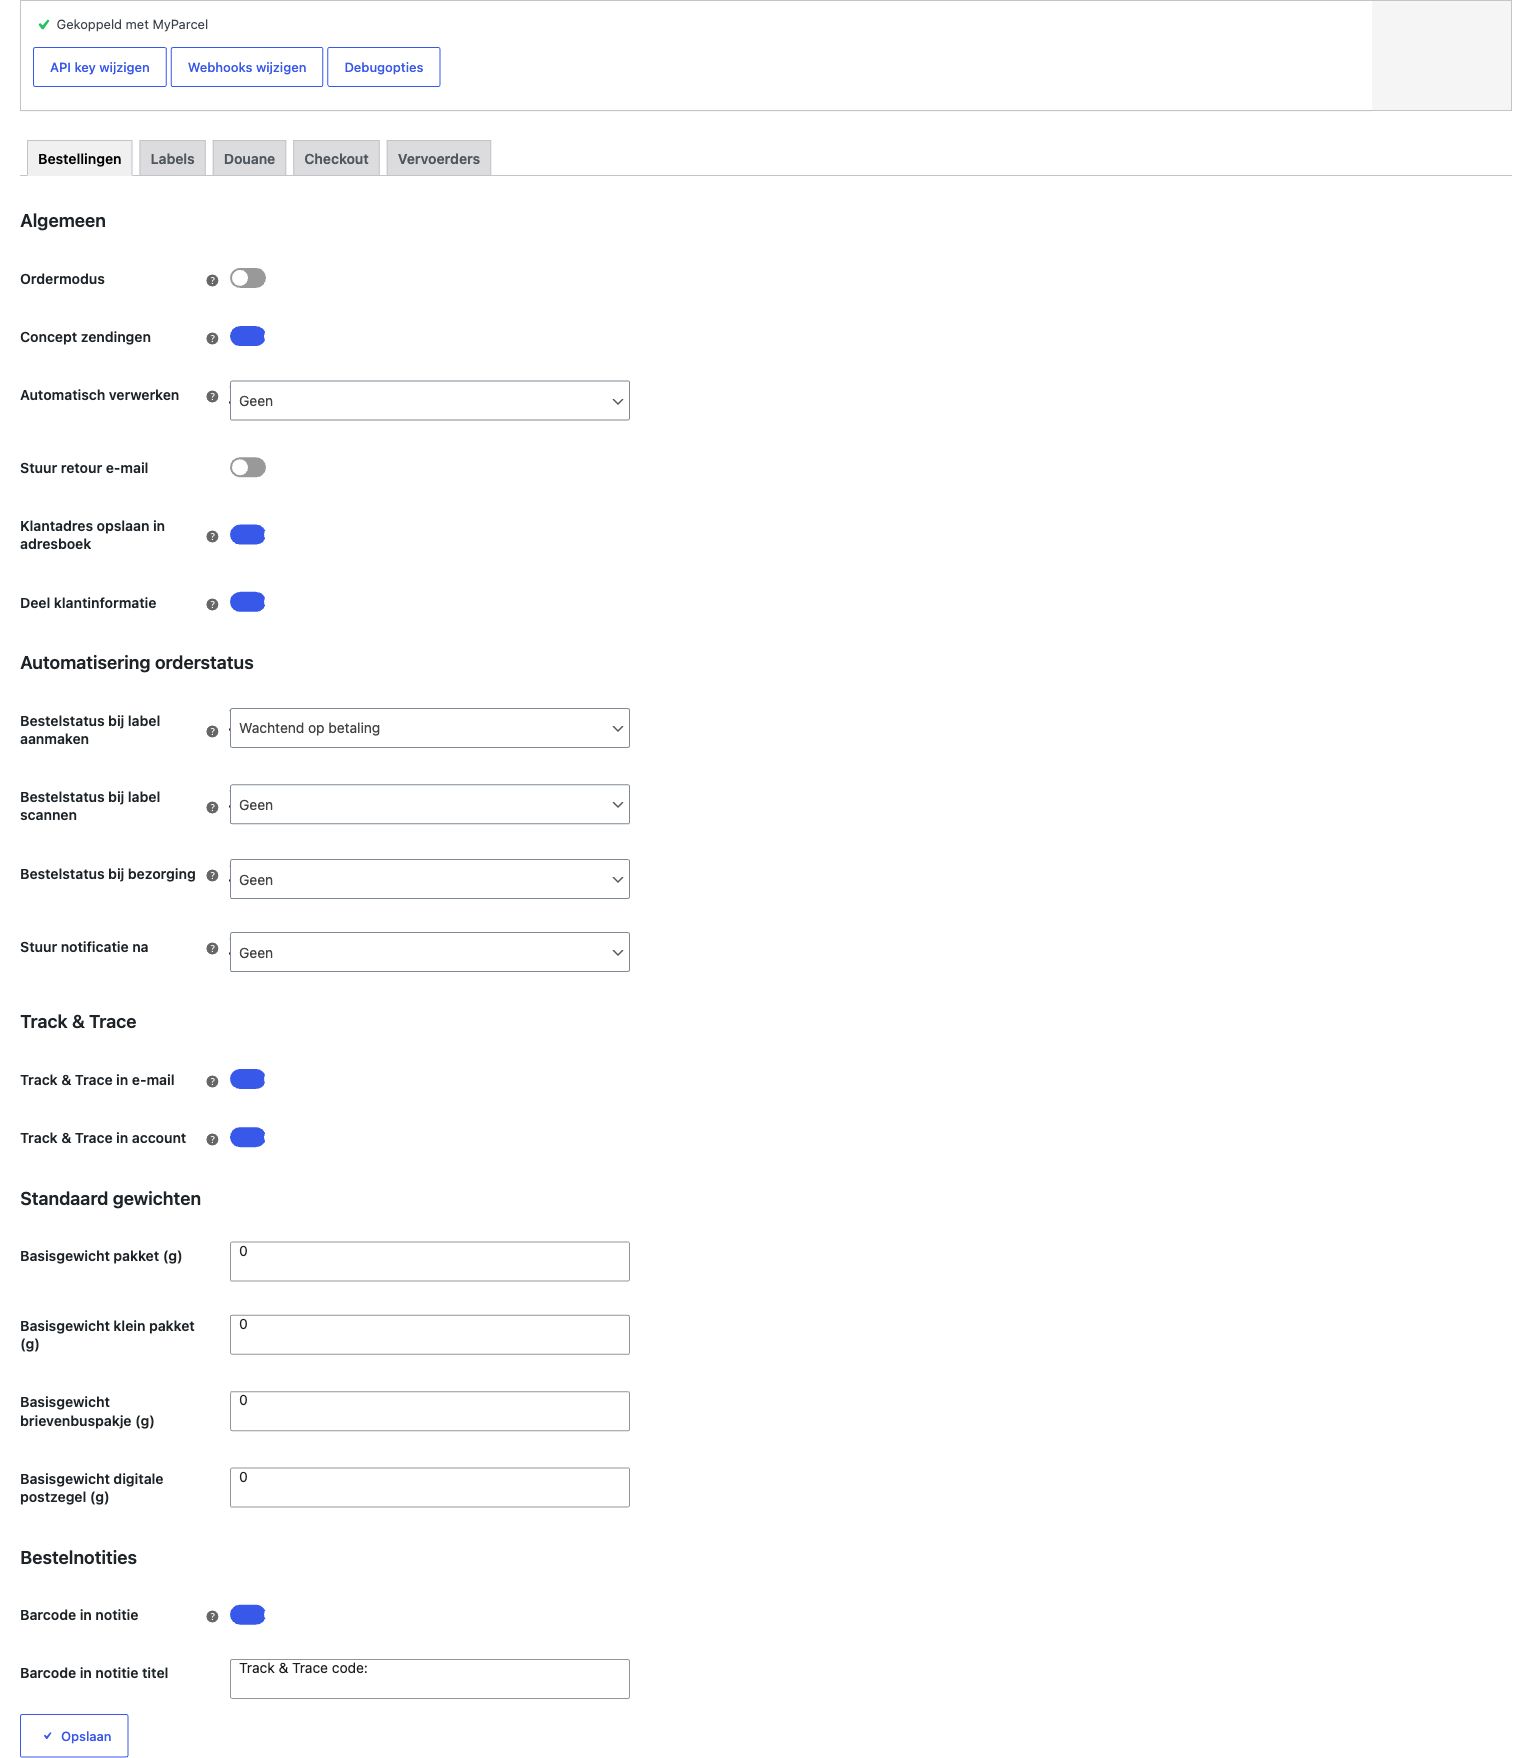
The first and most important tab — this is where you set how orders flow through your shop.
General
- Order mode — On: full order (customer data, line items, notes) to MyParcel. Off: only a label. Recommended on, provided Import order information is also on in MyParcel.
- Concept shipments — On: shipment stays as concept in MyParcel. Off: registered with the carrier directly. On during setup, off once everything runs.
- Auto-process — Which WooCommerce status triggers an automatic export? None / Pending payment / Processing / Completed. Start with None.
- Send return email — The customer automatically receives a return link. Recommended for fashion/shoes.
- Save customer address to address book — Addresses end up in your MyParcel address book.
- Share customer information — Email + phone to MyParcel. Required for Track & Trace email and mandatory for international. Recommended on.
Order status automation
Let the WooCommerce order status follow the shipping process automatically.
- Order status when label is created — typically Processing.
- Order status when label is scanned — typically Completed.
- Order status on delivery — Completed (if not earlier).
- Send notification after — which status transition triggers a WooCommerce email.
Track & Trace
- Track & Trace in email — link in the WooCommerce order confirmation. Recommended on.
- Track & Trace in account — link on the customer's My account page.
Default weights
Each package type has an empty weight. MyParcel adds it on top of the product weight.
| Package type | Typical empty weight |
|---|---|
| Parcel (brown box) | 200 – 400 g |
| Small package | 100 – 200 g |
| Mailbox parcel | 50 – 100 g |
| Digital stamp | 10 – 30 g |
Order notes
- Barcode in note — Track & Trace code as an order note.
- Barcode in note title — prefix before the code. Default:
Track & Trace code:.
6 · Settings · Labels
Everything about the label itself — text, format and print behaviour.

Description on the label
Variables are filled in automatically when the label is created:
| Variable | Becomes |
|---|---|
[DELIVERY_DATE] | Delivery date |
[ORDER_ID] | WooCommerce order number |
[PRODUCT_ID] | Product ID |
[PRODUCT_NAME] | Product name |
[PRODUCT_QTY] | Quantity |
[PRODUCT_SKU] | SKU |
[CUSTOMER_NOTE] | Customer note |
Examples: Order [ORDER_ID] · [ORDER_ID] · [PRODUCT_QTY]× [PRODUCT_NAME]
Print behaviour
- Print immediately — show the PDF directly after export.
- Ask label position — ask each time which positions on an A4 sheet to use.
Defaults
- Label output — Open in new tab (print manually via the browser) or Download label.
- Label format — A4 (4 per page) for a standard printer, A6 (label printer) for Zebra/Brother.
7 · Settings · Customs
Required for shipments outside the EU (UK, Switzerland, US, Norway, Canada…). These values appear on the CN22/CN23 form attached to the label.

- Package contents — Goods (default for webshops), Documents, Gift, Commercial sample, Return shipment.
- HS code — harmonised customs code. Look up at tarief.douane.nl. Examples:
6109.10(T-shirts),9503.00(toys),3304.99(make-up). - Country of origin — where the product comes from (not where you store it).
8 · Settings · Checkout
What your customer sees and can choose at checkout.

Address fields
- Use separate address fields — splits Street into Street + Number + Suffix. Recommended on — prevents undeliverable parcels.
- MyParcel Address widget (BETA) — autocomplete for NL postal code + house number.
Delivery options
- Show delivery options — master switch for the checkout widget. Recommended on.
- Show delivery options for backorders — also show for out-of-stock products.
- Position in checkout — After billing address, After shipping address, or After order note.
- Allowed shipping methods — link each WooCommerce shipping method to a package type (Default, Parcel, Small package, Mailbox parcel, Digital stamp, Unfranked). One method = one package type.
- Price type — Included (total price) or Surcharge (only the difference).
- Delivery options title — heading above the widget.
- Custom CSS — your own styling.
Business and consumer see different options
Since plugin version 6.8.0 the checkout offers business customers the delivery options their carrier actually has for businesses, which are not always the ones consumers get. The plugin decides this from the company name in the checkout address: fill one in and the order counts as business. There is nothing to configure, it follows the carrier. The technical side lives in the Delivery Options widget.
Pickup points
- Default view — Map or List.
- Users can switch between list and map — Recommended on.
- Exclude parcel lockers — hide unmanned lockers.
- Closed days — days you don't ship.
9 · Settings · Carriers
Each carrier has its own sub-tab. Which ones appear depends on what you've activated on your MyParcel account.

All carriers are structured the same
Below I walk through PostNL as an example — DHL For You, DHL Parcel Connect, DPD, UPS, GLS and Trunkrs work identically (each with their own specific options).
Default export settings
- Enable age check (18+) — required for alcohol/tobacco.
- Enable signature — courier asks for a signature.
- Enable only recipient — no neighbours.
- Enable direct return — undelivered straight back to you.
- Enable larger than 100 × 70 × 58 cm — large parcels (surcharge).
- Enable tracked / Enable receipt code — extra tracking options.
Insurance
- Enable insurance — master toggle.
- Insure from (€) — threshold amount.
- Insure up to — max coverage NL.
- Insure up to (EU) / (EU + Rest of World) — maximums per region.
- Insure for percentage — e.g. 100% of the order value.
Insured amounts can differ
The plugin refreshes its carrier data periodically, and amounts a carrier no longer offers drop out of the list. What you see can therefore differ from the amounts used as examples in this manual.
Delivery options — all fields
Home delivery options
- Enable home delivery — master toggle.
- Delivery days window — 1 to 14 days ahead.
- Processing time — working days between order and drop-off.
- Cut-off time — configurable per day.
- Shipping options — tick the days you ship.
Delivery moments
- Standard delivery + standard delivery price.
- Morning delivery + morning delivery price.
- Evening delivery + evening delivery price.
- Monday delivery + Monday delivery price.
- Same-day delivery + same-day delivery price, for carriers that offer it. Since 6.9.0 these settings also appear for carriers that offer same-day as their delivery type, such as Trunkrs. Before that, such a carrier did not show up in the sub-tabs at all.
Shipping options
- Only recipient + surcharge.
- Signature + surcharge.
- Allow Prio (24 hour) + surcharge — express delivery.
Pickup location options
- Enable pickup locations.
- Pickup price — positive = surcharge, negative = discount.
Don't forget to save
Always click Save at the bottom of each carrier tab before switching to another tab.
10 · Product settings
Every product has an extra MyParcel tab under Product data. Here you override the global settings from Carriers and Customs per product. Each field has a 🔒 lock icon — click it open to detach from the global value.

MyParcel options
- Package type — overrides the default package type for this product.
- In mailbox — how many of this product fit together in one mailbox parcel.
-1= not mailbox. Example: stickers where 50 fit in a mailbox parcel → set50. If a customer orders 51, the order automatically becomes a Parcel.
Product delivery options
- Delay shipping — extra working days before this product can leave. For made-to-order, external warehouses, etc.
- Disable shipping options — hides the entire MyParcel delivery widget at checkout when this product is in the cart. For virtual products or gift cards.
- Exclude parcel lockers — hides DHL/PostNL parcel lockers as a pickup point for this product.
Product customs options
- Country of origin — more specific than the global value. E.g. globally Netherlands, dropship product China.
- Customs code (HS code) — product-specific HS code.
Product export options (all with lock-override)
- Enable age check (18+) — e.g. for alcohol.
- Enable direct return — undelivered straight back.
- Enable insurance — always insure this product.
- Enable larger than 100 × 70 × 58 cm or heavier than 23 kg — for oversized.
- Enable only recipient / Enable signature / Enable Prio (24 hour).
- Enable tracked / Enable receipt code.
- Fresh delivery / Frozen delivery — for food shops.
The lock icon 🔒
Lock closed = product uses the global setting. Lock open = product-specific value is active.
11 · The orders list
On WooCommerce → Orders the plugin adds a MyParcel column and bulk actions. At a glance, you see whether each order has been created and what status it has.

Bulk actions
Tick orders and pick from the Bulk actions dropdown:
- MyParcel: Export — creates shipments at MyParcel (concept or direct).
- MyParcel: Export & Print — same as above, plus a combined PDF.
Bulk flow for 50+ orders/day
Process all your daily orders in one click. Combine with Auto-process on Processing and the plugin runs almost entirely on its own.
12 · The order detail page
On the detail page of an individual order a MyParcel box appears in which you fine-tune all shipping options for that order.

What's in the box?
- Carrier — radio with all available carriers. MyParcel auto-picks the most suitable one; you can override per order.
- Package type — override for this order (e.g. mailbox parcel for a small order).
- Delivery method — Standard delivery or Pickup at a pickup point.
- Number of labels — split a large order across multiple parcels? Set
2or3. - Insurance — override the global rules for this order.
- Saturday delivery / Signature required — toggles with lock.
The four action buttons
- Save — stores settings without registering the shipment.
- Export — registers the shipment with MyParcel. Generates a barcode.
- Print — prints the label of an already exported shipment.
- Export and print — everything in one click.
The Labels table at the bottom of the box
Once an order has been exported, a table with all labels appears below the buttons.

Actions dropdown per label
Reprint label · Generate return label · Cancel shipment (only possible while the parcel hasn't been scanned by the carrier yet).
13 · The checkout experience
What your customer sees once the delivery address is filled in — appears as soon as at least one carrier is enabled and the WooCommerce shipping method is linked to a MyParcel package type (§8).
The customer picks a carrier and delivery moment from a date carousel, a time slot and optional extra options (signature, only recipient). Below home delivery, a Pickup at a pickup location block appears with an interactive map, opening hours and a list/map toggle.
Business and consumer customers do not necessarily see the same delivery moments here. Fill in a company name and the order counts as business, see §8.
14 · Daily use
Using a sales channel?
If a sales channel is also connected, create the shipment and print the label from the MyParcel backoffice instead of from here, to avoid duplicate orders in MyParcel. Everything else on this page still works as described.
Workflow 1 — per order
- Open WooCommerce → Orders and click an order.
- At the bottom: the MyParcel box → choose carrier, package type, etc.
- Click Export and print.
- The PDF opens or downloads — stick the label on the box.
Workflow 2 — bulk (10+ orders/day)
- From the order list, tick orders.
- Bulk actions → MyParcel: Export & Print.
- Click Apply. One combined PDF with all labels.
When you're billed
You're only billed once a shipment is actually handed over to the carrier. Digital stamps are the exception — they are charged immediately on export.
Returns
Three ways, from most to least automated:
- Automatic return email — Orders → General → Send return email on. With every export the customer receives a return link.
- Manual return label — in the MyParcel box on the order, choose Generate return. Send the label to the customer yourself.
- Return portal — enable in your MyParcel backoffice. The customer goes to a URL, enters the order number, and gets a label instantly.
15 · Something's not working — diagnostics
Something not behaving as expected? Run through this table top to bottom — three out of four issues are fixed within 5 minutes.
| Symptom | What to check |
|---|---|
| No status badge or Not connected | (1) Plugin activated? (2) WooCommerce 7.0+ and PHP 8.1+? (WooCommerce → Status) (3) Server, LiteSpeed/Redis and browser cache cleared? |
| Widget doesn't appear at checkout | (1) §8: Show delivery options on? (2) Each shipping method linked to a package type? (3) Standard shortcode checkout ([woocommerce_checkout])? (4) JS error in browser console (F12)? |
| Labels are not created | (1) Status badge still green? (2) Order has a shipping + customer address? (3) Shipping method present (local pickup doesn't count)? (4) Product weight filled in? (5) Error message on the shipment in the MyParcel backoffice? |
| Track & Trace not in the email | (1) §5: Track & Trace in email on? (2) Order already exported? Without a barcode there's no link. (3) Mail sent? (WooCommerce → Status → Logs) (4) Customer's spam folder? |
| Wrong address on the label | (1) Turn on Use separate address fields (§8). (2) Use the MyParcel Address widget for NL. (3) The label shows the Shipping address, not the billing address. |
| Everything becomes Parcel, never Mailbox | (1) §8: the mailbox method shouldn't also sit under Parcel. (2) One shipping method = one package type. (3) Use shipping classes to link products to package types. |
| Conflict with another plugin | Deactivate other shipping/checkout plugins one by one to isolate. Postal-code-checker plugins can split street/number fields that MyParcel expects. |
16 · FAQ
Does the plugin cost money?
No. You only pay for the shipments via MyParcel.
Can I link two MyParcel accounts to a single WooCommerce shop?
Not out of the box — one API key per shop. For two brands: run two separate WooCommerce shops.
How do I change the sender address on the label?
That's set in your MyParcel backoffice (Shop settings → General → Address details), not in the plugin. Changes apply immediately.
Which statuses for "Auto-process"?
Mollie/iDEAL? Orders go straight to Processing. Bank transfer and manual processing? Completed.
Can I print more than 4 labels per A4?
No — A4 is always 4 per page. Consider an A6 label printer at 20+ orders/day.
Does it work with Afterpay/Klarna?
Yes — MyParcel is independent from your payment provider.
Customer picks a pickup point — how do I see it on the label?
The pickup point is sent as the recipient address to MyParcel automatically.
Evening delivery isn't visible for some addresses
Address-dependent — determined by the carrier, not the plugin.
I see duplicate DPD tabs
Not a bug — MyParcel distinguishes two DPD contracts. Only enable your active contract.
Can I have parcels picked up by the carrier?
Yes — under Carriers → [carrier] → Enable carrier pickup.
I updated the plugin and now something isn't working
Roll back via WP Rollback or the GitHub release. Report the bug at github.com/myparcelnl/woocommerce/issues.
Resources & support
- github.com/myparcelnl/woocommerce ↗ — source code, releases, issues.
- wordpress.org/plugins/woocommerce-myparcel ↗ — plugin listing.
- backoffice.myparcel.nl ↗ — account, API key, billing.
- Contact MyParcel support — 023 - 30 30 315 · info@myparcel.nl.
This manual is written for plugin version 6.9.x. In newer versions field names or order may shift slightly; the overall plugin layout stays the same.