In short
The MyParcel app connects your Shopify shop to MyParcel. You link your Shopify shipping methods to a carrier and delivery option per country, print labels straight from Shopify, and Track & Trace is sent to the customer automatically. No code needed — everything runs from the Shopify admin.
Quickstart — your first parcel in 15 minutes
Enough to ship your first real order today. For deeper configuration, see Looking for… below.
- Account. Don't have a MyParcel account yet? Create one at myparcel.com/register.
- Copy the API key. Log in to backoffice.myparcel.com → Shop settings → Integrations → copy the API key.
- Add the app. In the Shopify App Store, search MyParcel → Add app → follow the steps.
- Connect the app. Open Apps → MyParcel → Instellingen (Settings), paste the key in the API key field and save.
- First label. Open Apps → MyParcel, tick a paid order and click Printen (Print). Your PDF label rolls out.
You're done when you see this
- The API key is saved in Instellingen → Account
- Your shipping methods are linked under Standaard exportinstellingen (no orange MyParcel niet actief badge)
- You can print a test order and the PDF label opens
Looking for…
| What do you want to do? | Go to |
|---|---|
| First-time setup | Quickstart |
| Connect your account | 3 · Connecting the app |
| Connect via a sales channel | Connecting via a sales channel |
| Look up a specific setting | 4 · Settings · General to 7 · Settings · Worldwide shipments |
| Link a shipping method to a carrier | 5 · Settings · Export & zones |
| A different setting per product | 8 · Product settings |
| What the customer sees at checkout | 9 · The checkout experience |
| Print or export labels | 10 · Daily use |
| Something's not working | 11 · Something's not working — diagnostics |
| Answer to a frequently asked question | 12 · FAQ |
1 · Preparing your MyParcel account
Before you start in Shopify, take care of four things in your MyParcel backoffice:
- Billing and return address — Shop settings → General. This appears on every label.
- Activate carriers — Shop settings → Carriers. Only enabled carriers appear in the app later.
- Generate an API key — Shop settings → Integrations.
- Set up your shipping methods in Shopify under Settings → Shipping and delivery. The app links to these methods (see §5).
2 · Installing the app
- Go to the Shopify App Store and search MyParcel.
- Click Add app and follow the steps to add it to your shop.
- Open the app via Apps → MyParcel. It updates itself automatically from then on.
3 · Connecting the app (API key)
Open Apps → MyParcel and click Instellingen (Settings) in the top right. The settings live on a single page; the first block is Account.
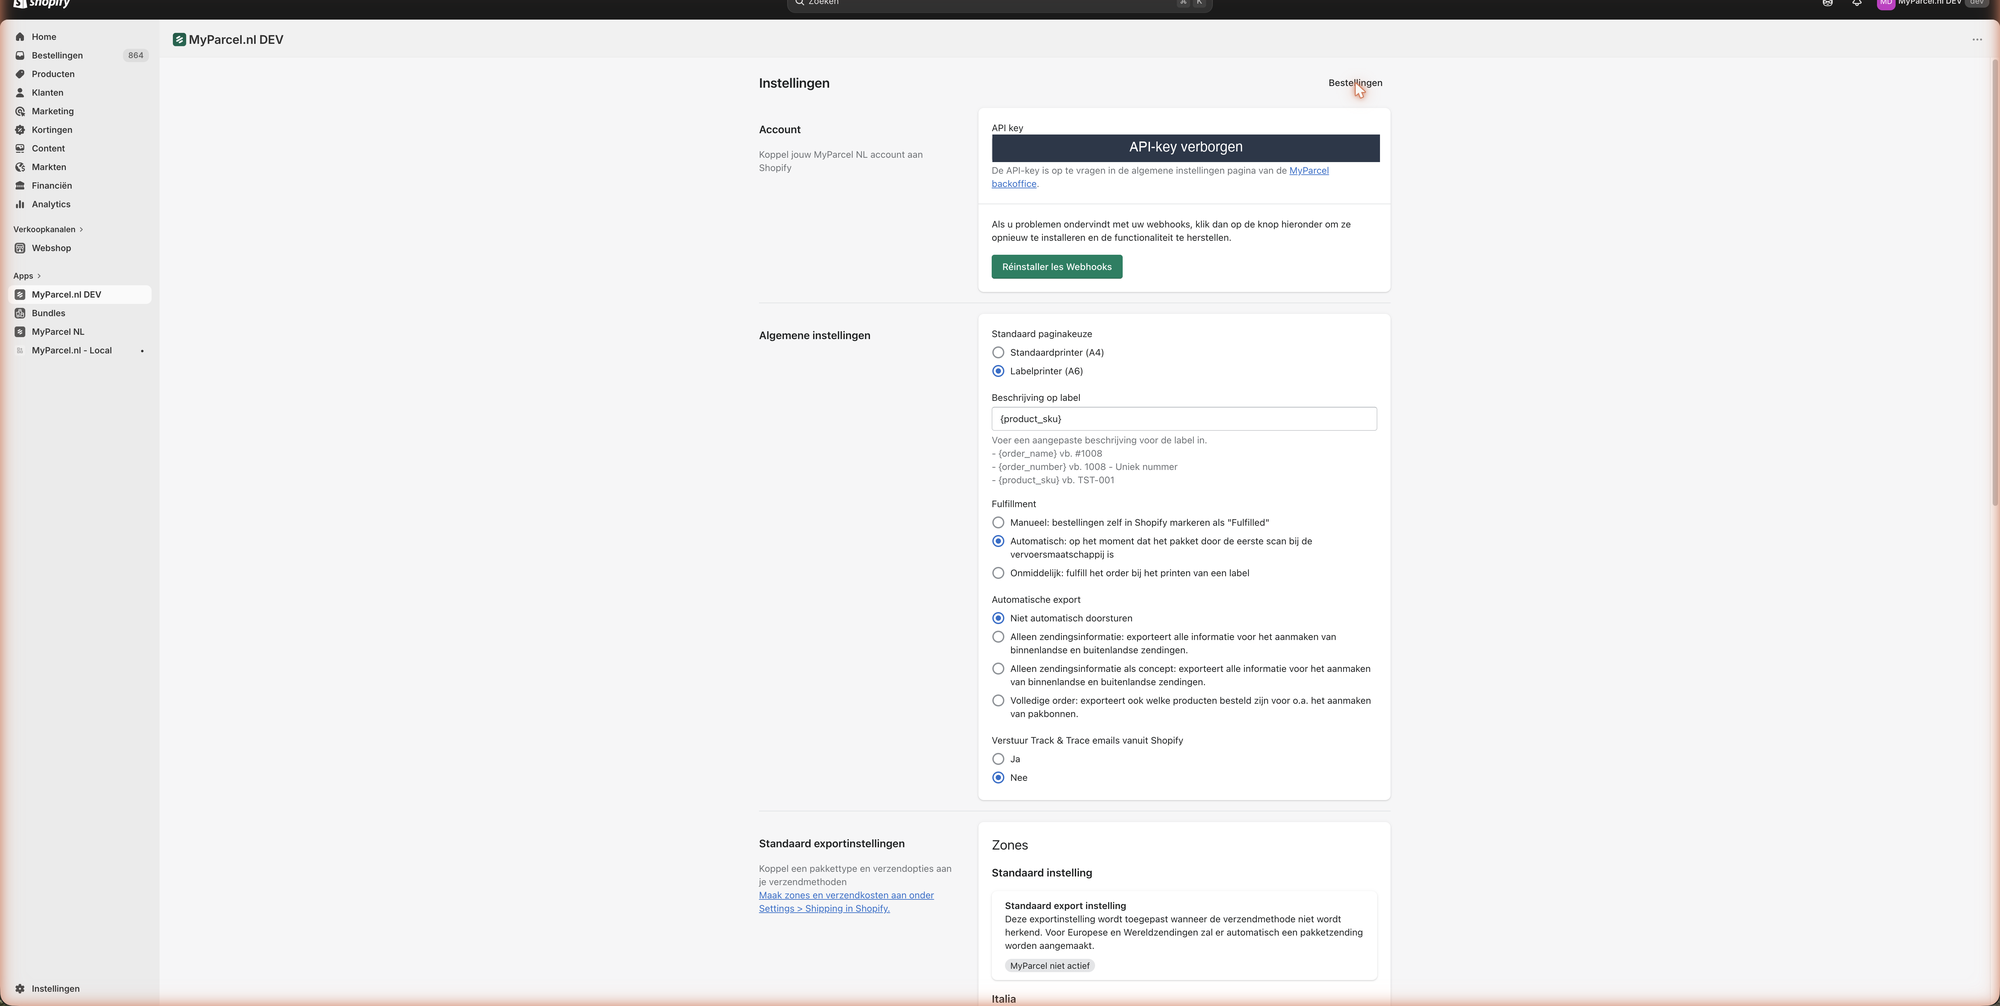 The API key is hidden in this screenshot.
- Paste the key from your MyParcel backoffice into API key.
- Scroll down and click Opslaan (Save).
- Use Réinstaller les Webhooks only if the automatic status updates ever stop working — it restores the connection.
Not working?
Most common causes: didn't click Opslaan (Save) · a space copied before/after the key · key from a different shop · key from a different environment (live vs sandbox) than your MyParcel account.
Connecting via a sales channel
You can also connect through a sales channel in your MyParcel backoffice, instead of copying the API key by hand.
- In your MyParcel backoffice, go to Settings → Sales channels and create a new channel (or choose an existing one).
- Choose Shopify as the channel type.
- Give the channel a name and fill in your domain (your Shopify shop URL).
- Save the details and click Create connection.
- Log in to your Shopify environment when prompted to confirm the connection.
What does the app do in your Shopify admin?
| Where? | What can you do? |
|---|---|
| Apps → MyParcel | The Bestellingen (Orders) screen — select orders and print or export labels. |
| Apps → MyParcel → Instellingen | All settings: Account, General, Export & zones, Pickup points, Worldwide shipments. |
| Product → Verzending (Shipping) | Standard Shopify fields (weight, country of origin, HS code) that MyParcel reads. |
Two MyParcel labels in your app list?
On a development store you may see MyParcel.nl DEV or MyParcel.nl - Local next to the published MyParcel NL app. Use the published app for live shipping.
4 · Settings · General
In Instellingen, below Account, you'll find Algemene instellingen (General settings).
- Standaard paginakeuze (Default page format) — Sets the label format. Standaardprinter (A4) for a regular printer, Labelprinter (A6) for a Zebra/Brother label printer.
- Beschrijving op label (Label description) — The text on your label. Use variables that fill in automatically:
{order_name}(e.g. #1008),{order_number}(e.g. 1008) or{product_sku}(e.g. TST-D01). - Fulfilment — When an order is marked Fulfilled in Shopify. Choose Manueel (you do it), Automatisch (on the carrier's first scan) or Onmiddellijk (when you print a label).
- Automatische export (Automatic export) — Whether orders go to MyParcel automatically. Niet automatisch doorsturen to do it by hand, or an export option to send shipment info (or the full order, including products for packing slips) automatically.
- Verstuur Track & Trace emails vanuit Shopify (Send Track & Trace emails from Shopify) — Nee lets MyParcel send the email; Ja lets Shopify send it.
5 · Settings · Export & zones
This is where you link your Shopify shipping methods to a MyParcel carrier, delivery option and package type — per zone (country or region). Create the zones and rates first in Shopify under Settings → Shipping and delivery.
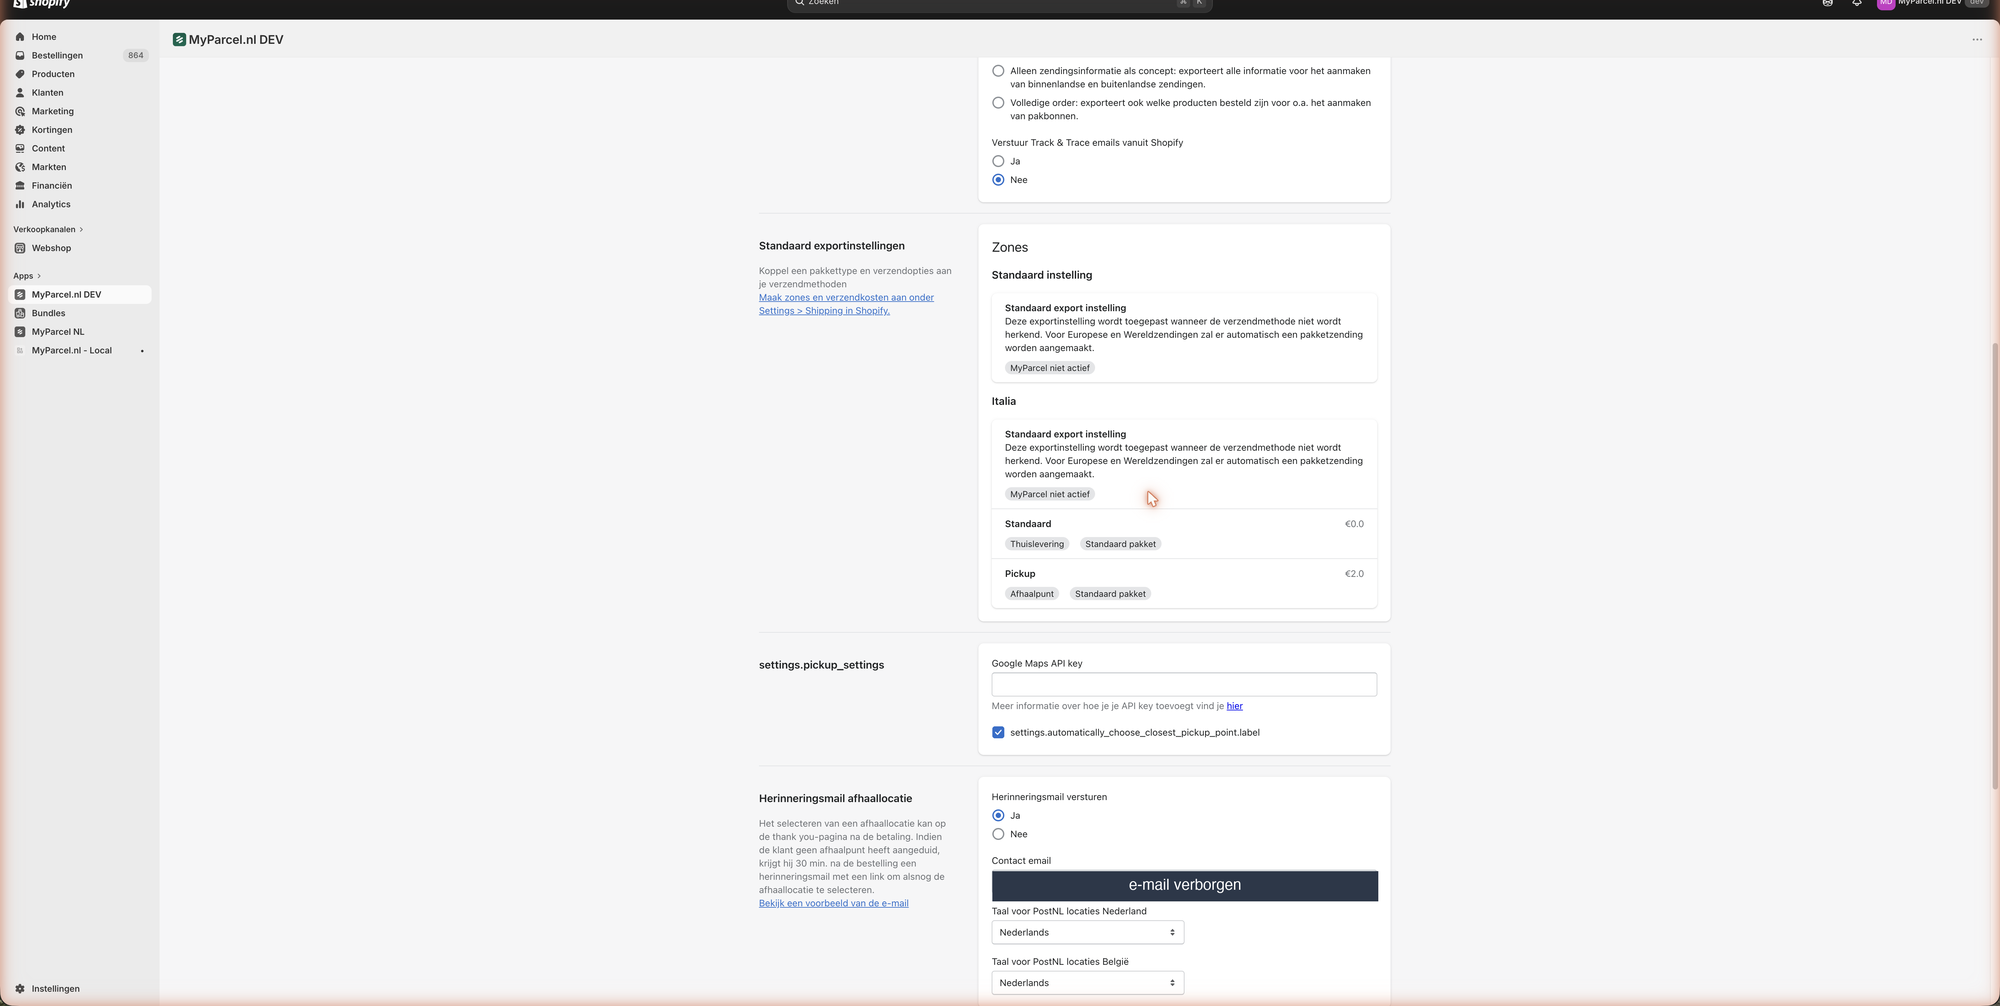
- Standaard instelling (Default setting) — The fallback used when a shipping method isn't recognised. For European and worldwide shipments a parcel shipment is created automatically.
- Per zone — Each zone lists your Shopify shipping methods (e.g. Standaard and Pickup) with the price and the linked MyParcel options (Thuislevering/home delivery or Afhaalpunt/pickup, plus the package type).
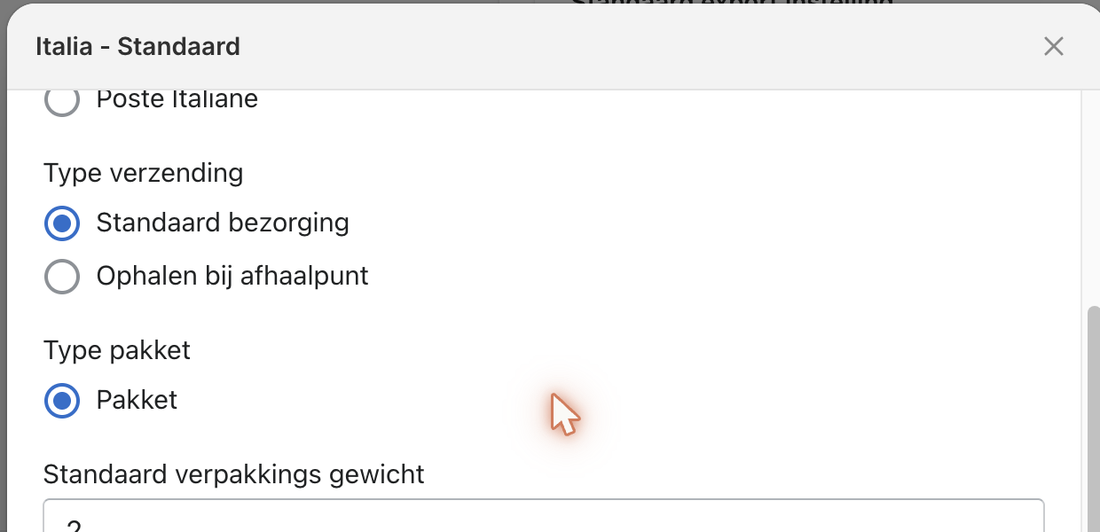
Click a shipping method to open its mapping:

- Verzenden via MyParcel NL (Ship via MyParcel) — Set to Ja to send this method through MyParcel.
- Verzenden via (Ship via) — The carrier for this method. Which carriers appear depends on the zone (e.g. PostNL, DHL and DPD in the Netherlands; InPost and Poste Italiane in Italy).
- Type verzending (Shipment type) — Standaard bezorging (home delivery) or Ophalen bij afhaalpunt (pickup point).
- Type pakket (Package type) — e.g. Pakket (parcel). Choose a letterbox option if the shipment fits through the letterbox.
- Standaard verpakkings gewicht (Default packaging weight) — Weight of the packaging in grams. Added on top of the product weight.
Don't forget to save
After mapping your methods, scroll to the bottom of the settings page and click Opslaan (Save).
6 · Settings · Pickup points
Lower on the settings page you'll find the pickup point and reminder-email options.
- Automatically choose the closest pickup point — Picks the nearest point for the customer automatically.
- Herinneringsmail afhaallocatie (Pickup location reminder email) — If the customer didn't choose a pickup point, MyParcel emails a reminder with a link 30 minutes after the order. Set Herinneringsmail versturen to Ja to enable, fill in a Contact email for your own customer service, and pick the language for PostNL locations (NL/BE).
7 · Settings · Worldwide shipments
At the bottom of the settings page, set the customs defaults used for shipments outside the EU when a product has no customs details of its own.
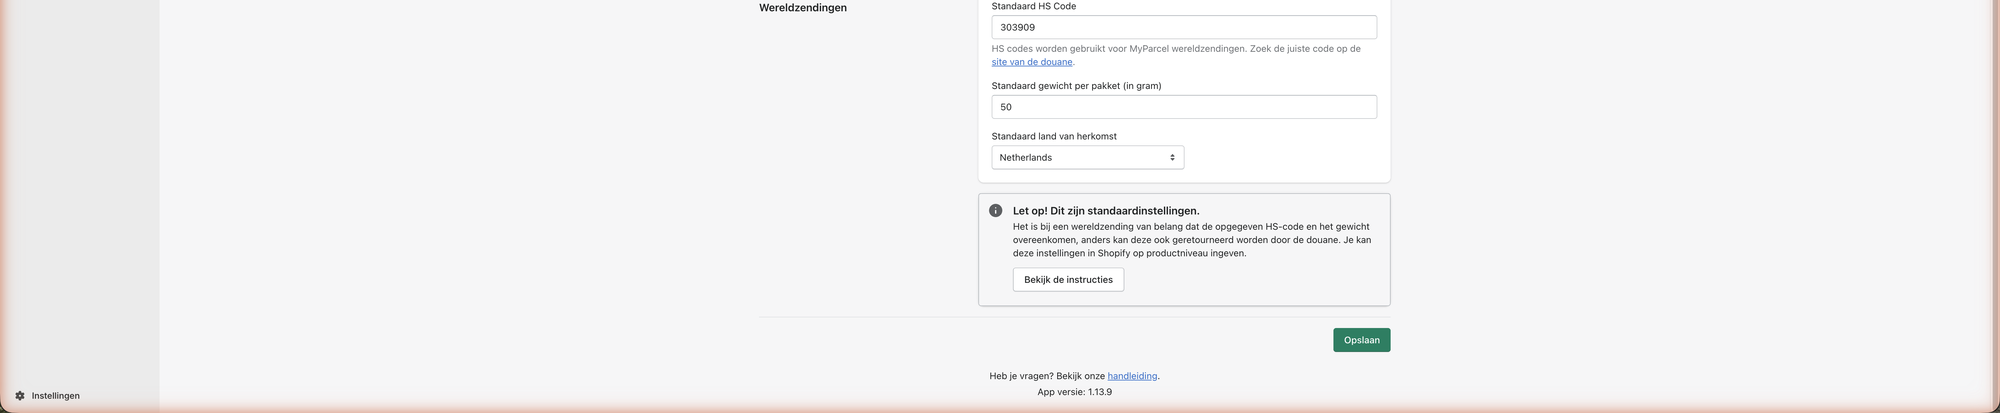
- Standaard HS Code (Default HS code) — Customs code for your products. Look it up at tarief.douane.nl. A wrong code can get the parcel returned by customs.
- Standaard gewicht per pakket (in gram) (Default weight per parcel, grams) — Used when a product has no weight. Pick a value close to your average.
- Standaard land van herkomst (Default country of origin) — The country you ship from.
8 · Product settings
The MyParcel app does not add fields to the Shopify product page. You set shipping details through the standard Shopify fields under Verzending (Shipping) on the product or variant. MyParcel reads these.
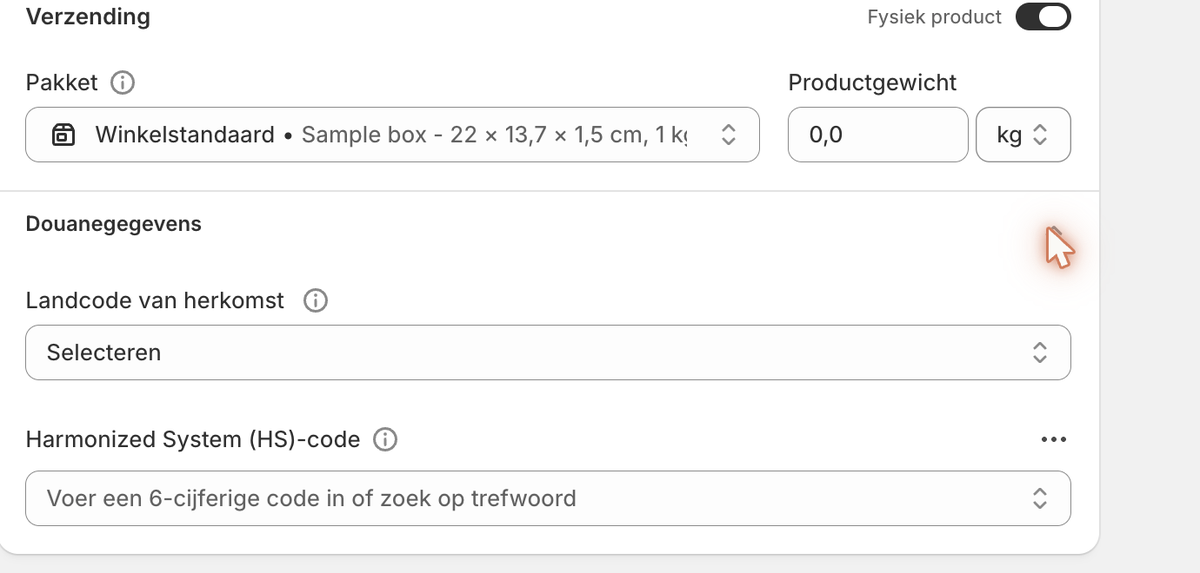
- Pakket (Package) — Shopify's standard package format for this product.
- Productgewicht (Product weight) — Always fill this in; it affects the shipping price.
- Landcode van herkomst (Country of origin, under Douanegegevens/Customs) — Where the product comes from. Needed outside the EU.
- Harmonized System (HS)-code (under Douanegegevens) — Enter a 6-digit code or search by keyword. Important for worldwide shipments.
9 · The checkout experience
What your customer sees once the delivery address is filled in. The options depend on your settings in §5.
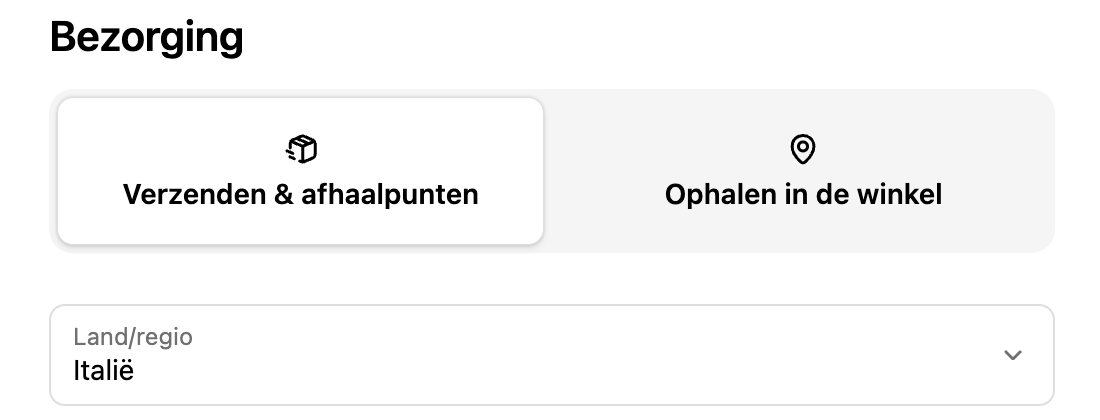
The customer first picks Verzenden & afhaalpunten (Shipping & pickup points) or Ophalen in de winkel (In-store pickup). The shipping methods for the chosen country then appear.
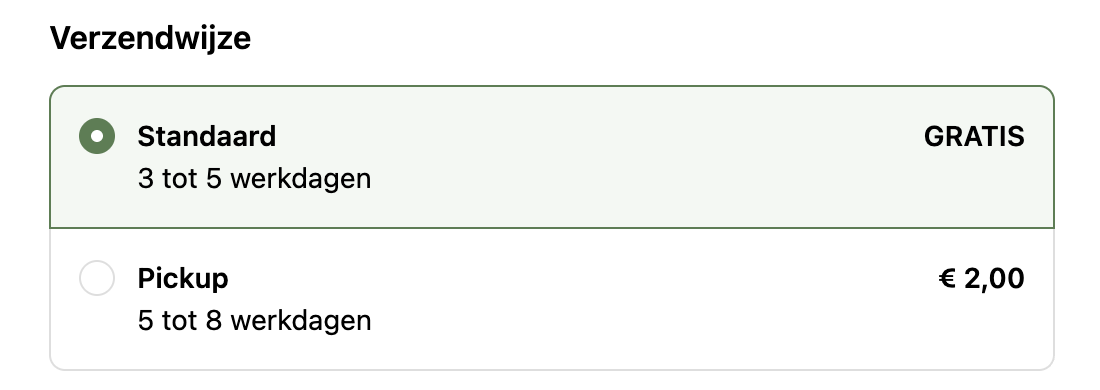
- Standaard (Standard) — Regular home delivery (in the example: free, 3–5 working days).
- Pickup — Collect at a nearby pickup point (in the example: € 2.00, 5–8 working days).
If you've enabled pickup points (§5 and §6), the customer can choose a pickup point on the thank-you page after checkout. If they don't, a reminder email follows. Prices and delivery times are examples — they depend on your own settings and contract.
10 · Daily use
Open Apps → MyParcel. You land on the Bestellingen (Orders) screen, with tabs such as All, Paid & Unfulfilled, Printed, Fulfilled and Onvolledig (Incomplete).
 Customer data is masked in this screenshot.
- Tick the order(s) you want to process.
- Use the action bar that appears at the top:

- Printen (Print) — Creates and prints the labels.
- Bestelling exporteren (Export order) — Sends the order(s) to MyParcel.
- Maak een concept aan (Create a draft) — Creates a draft shipment to finish later.
When you're billed
You're only billed once a shipment is actually handed over to the carrier.
11 · Something's not working — diagnostics
Run through this table top to bottom — most issues are fixed within 5 minutes.
| Symptom | What to check |
|---|---|
| The app screen stays blank | On a development store the MyParcel.nl DEV / Local app only renders with a running dev server. Use the published MyParcel NL app. |
| "Geen exportinstellingen gevonden voor de verzendmethode" | That order's shipping method isn't linked. Map the correct zone and method in §5. |
| No pickup points at checkout | Enable pickup in your zone mapping (§5) and check the pickup point settings (§6). |
| Error when printing several labels | An order with an incomplete address can't be exported. Check orders with a warning (e.g. Afhaallocatie niet vermeld) and fix the address. |
| API key isn't accepted | Re-paste the key from the backoffice (Integrations) without extra spaces, then Opslaan (Save). |
| Worldwide shipment returned by customs | Make sure the HS code and weight match. Set defaults (§7) or precise values per product (§8). |
12 · FAQ
Does the app cost money?
No. You only pay for the shipments via MyParcel.
Where do I find my API key?
In your MyParcel backoffice under Shop settings → Integrations.
Which carriers can I use?
The carriers enabled on your MyParcel account, per zone — for example PostNL, DHL and DPD in the Netherlands, and InPost and Poste Italiane in Italy.
How do I change the sender address on the label?
That's set in your MyParcel backoffice (Shop settings → General), not in the app. Changes apply immediately.
Can my customers pick a pickup point?
Yes — enable pickup in your zone mapping (§5). The customer chooses a point on the thank-you page.
Can I send a return label to my customer?
Yes — return labels can be emailed to the customer. See your MyParcel backoffice for the return portal options.
Resources & support
- github.com/myparcelnl/shopify ↗ — manual & issues.
- apps.shopify.com ↗ — find and add the MyParcel app.
- backoffice.myparcel.com ↗ — account, API key, billing.