In short
The MyParcel extension connects your OpenCart 4 shop to MyParcel. Customers pick a delivery moment or pickup point in the checkout, you export orders and print labels from the OpenCart admin, and Track & Trace is generated automatically. No code needed, everything runs from Extensions in your admin. The extension comes in two parts: a Shipping method (the checkout rate) and a Module (all the settings, carriers and label handling).
Pre-release
The OpenCart 4 extension is currently in pre-release (version 1.0.0-beta.10) and the 1.0 launch is being prepared. It requires OpenCart 4.1.0.3 or newer and PHP 8.2 or newer. Screens and field names may still change between releases.
Quickstart, your first parcel in 15 minutes
Enough to ship your first real order today. For deeper configuration, see Looking for… below.
- Get your API key. Log in to backoffice.myparcel.com, go to Settings → API access and copy your API key.
- Install the extension. In OpenCart go to Extensions → Installer and upload the
.ocmod.zippackage. Then open Extensions → Extensions, install the MyParcel Module and the MyParcel Shipping method, and refresh the modifications cache when prompted. - Enter the API key. Open the MyParcel module settings, paste your API key on the General tab and click Save.
- Import your carriers. On the Carriers tab, click Import carrier configuration. Your carriers appear with their available services.
- Ship an order. Open Sales → Orders, click the green export button on an order, then the label button to download the PDF.
You're done when you see this
- The MyParcel module status shows enabled and Test API key confirms the key works
- Your carriers are listed on the Carriers tab
- An exported order shows a barcode and a Ready tracking status
Looking for…
| What do you want to do? | Go to |
|---|---|
| First-time setup | Quickstart |
| Understand the two plugin parts | 4 · The two parts explained |
| Enter or test the API key | 5 · Settings · General |
| Set label format and fallback size/weight | 6 · Settings · Shipment defaults |
| Turn carriers and services on or off | 7 · Settings · Carriers |
| Change what customers see in the checkout | 8 · Settings · Checkout |
| Set HS codes for customs | 9 · Settings · Customs and 10 · Product settings |
| Export orders and print labels | 11 · The orders list and 12 · The order detail page |
| See what a customer experiences | 13 · The checkout experience |
| Something isn't working | 15 · Something isn't working, diagnostics |
1 · Preparing your MyParcel account
Before you start in OpenCart, take care of two things in your MyParcel backoffice:
- Copy your API key. Log in to backoffice.myparcel.com, go to Settings → API access and copy the key. Keep it private, it grants access to your account.
- Activate your carriers. Under Settings → Carriers, make sure the carriers you want to ship with are active on your account. Only active carriers can be imported into the extension later.
2 · Installing the extension
The MyParcel extension is delivered as an OpenCart modification package (.ocmod.zip).
- Download the latest
myparcel.ocmod.zipfrom github.com/myparcelnl/opencart4/releases. - In your OpenCart admin go to Extensions → Installer and upload the package.
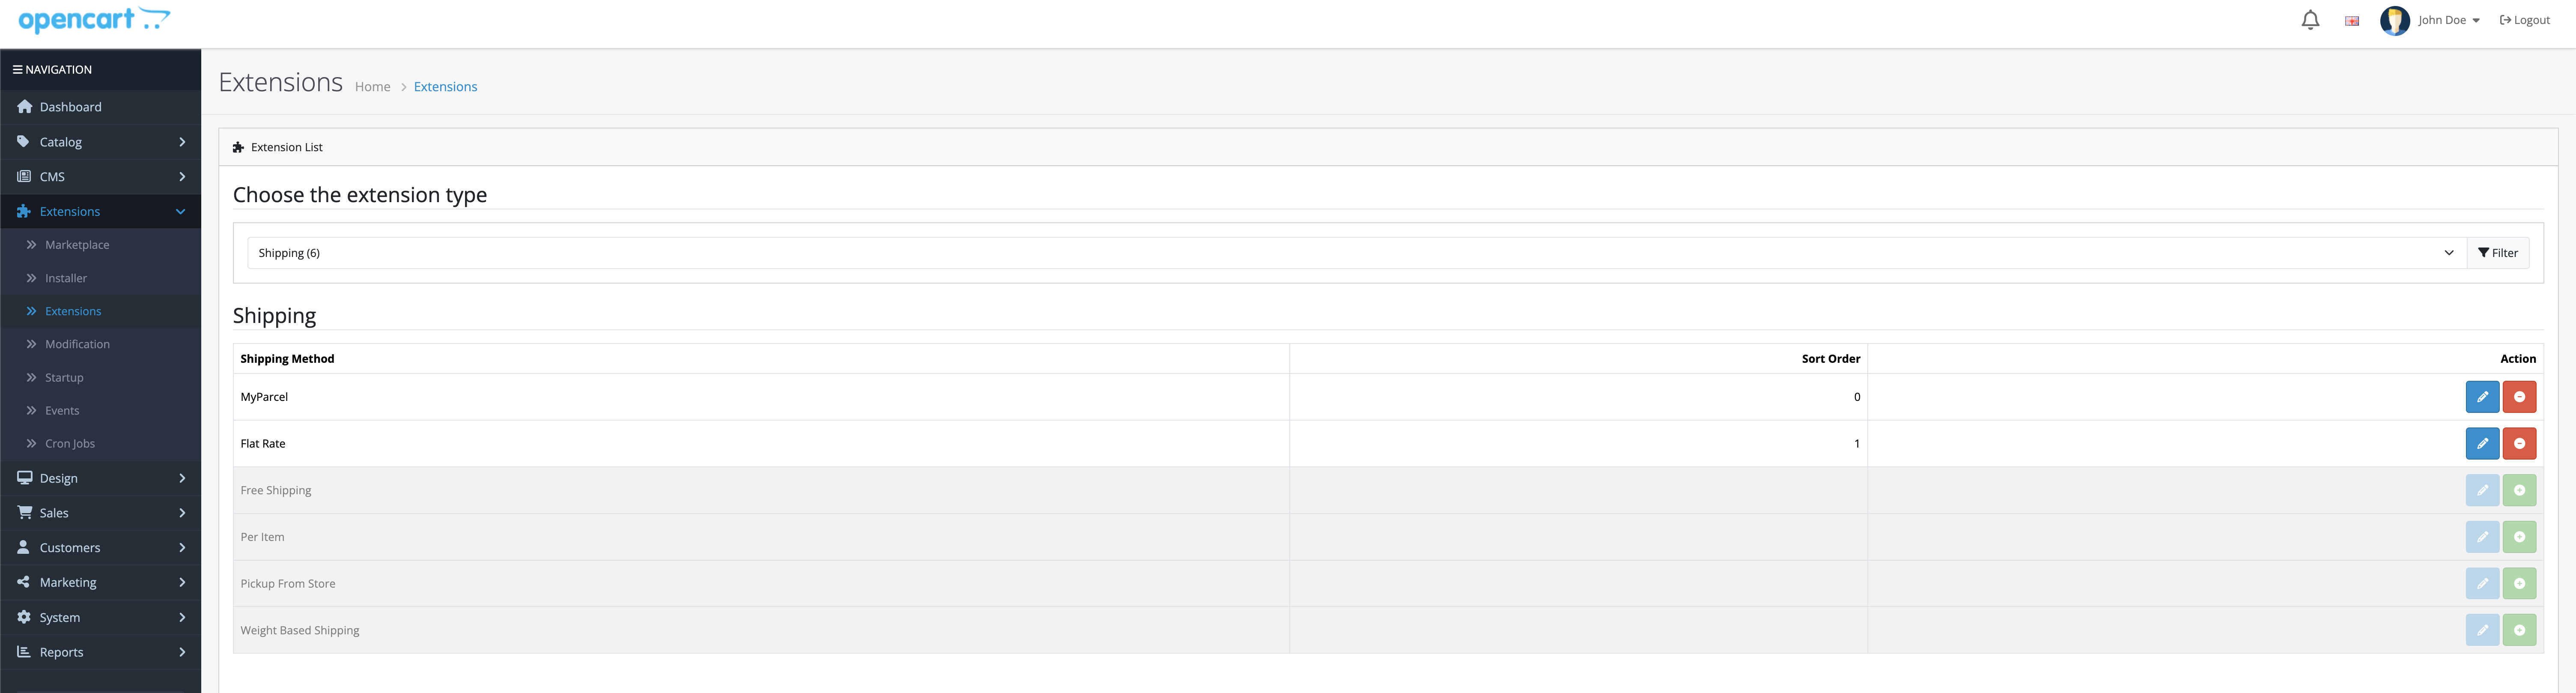
- Go to Extensions → Extensions and choose Modules from the Choose the extension type dropdown. Find MyParcel and click the green install button.
- On the same page choose Shipping from the dropdown. Find MyParcel and click install, then open its settings to set the rate, geo zone and status (see 4 · The two parts explained).
- When OpenCart asks, refresh the modifications cache (Extensions → Modifications → Refresh).
3 · Connecting the extension (API key)
Open the MyParcel Module (Extensions → Extensions → Modules → MyParcel, edit button) and go to the General tab.
- Set Status to enabled.
- Paste your API key.
- Leave Environment on Production for live shipping. Use Acceptance (test) only when you are testing against the MyParcel test environment.
- Click Save, then click Test API key to confirm the connection.

Not connecting?
The most common causes are an extra space pasted with the key, or the key belonging to the wrong environment (a production key with the Environment set to Acceptance, or the other way around).
4 · The two parts explained
Unlike a single all-in-one plugin, MyParcel for OpenCart lives in two places under Extensions. You use both.
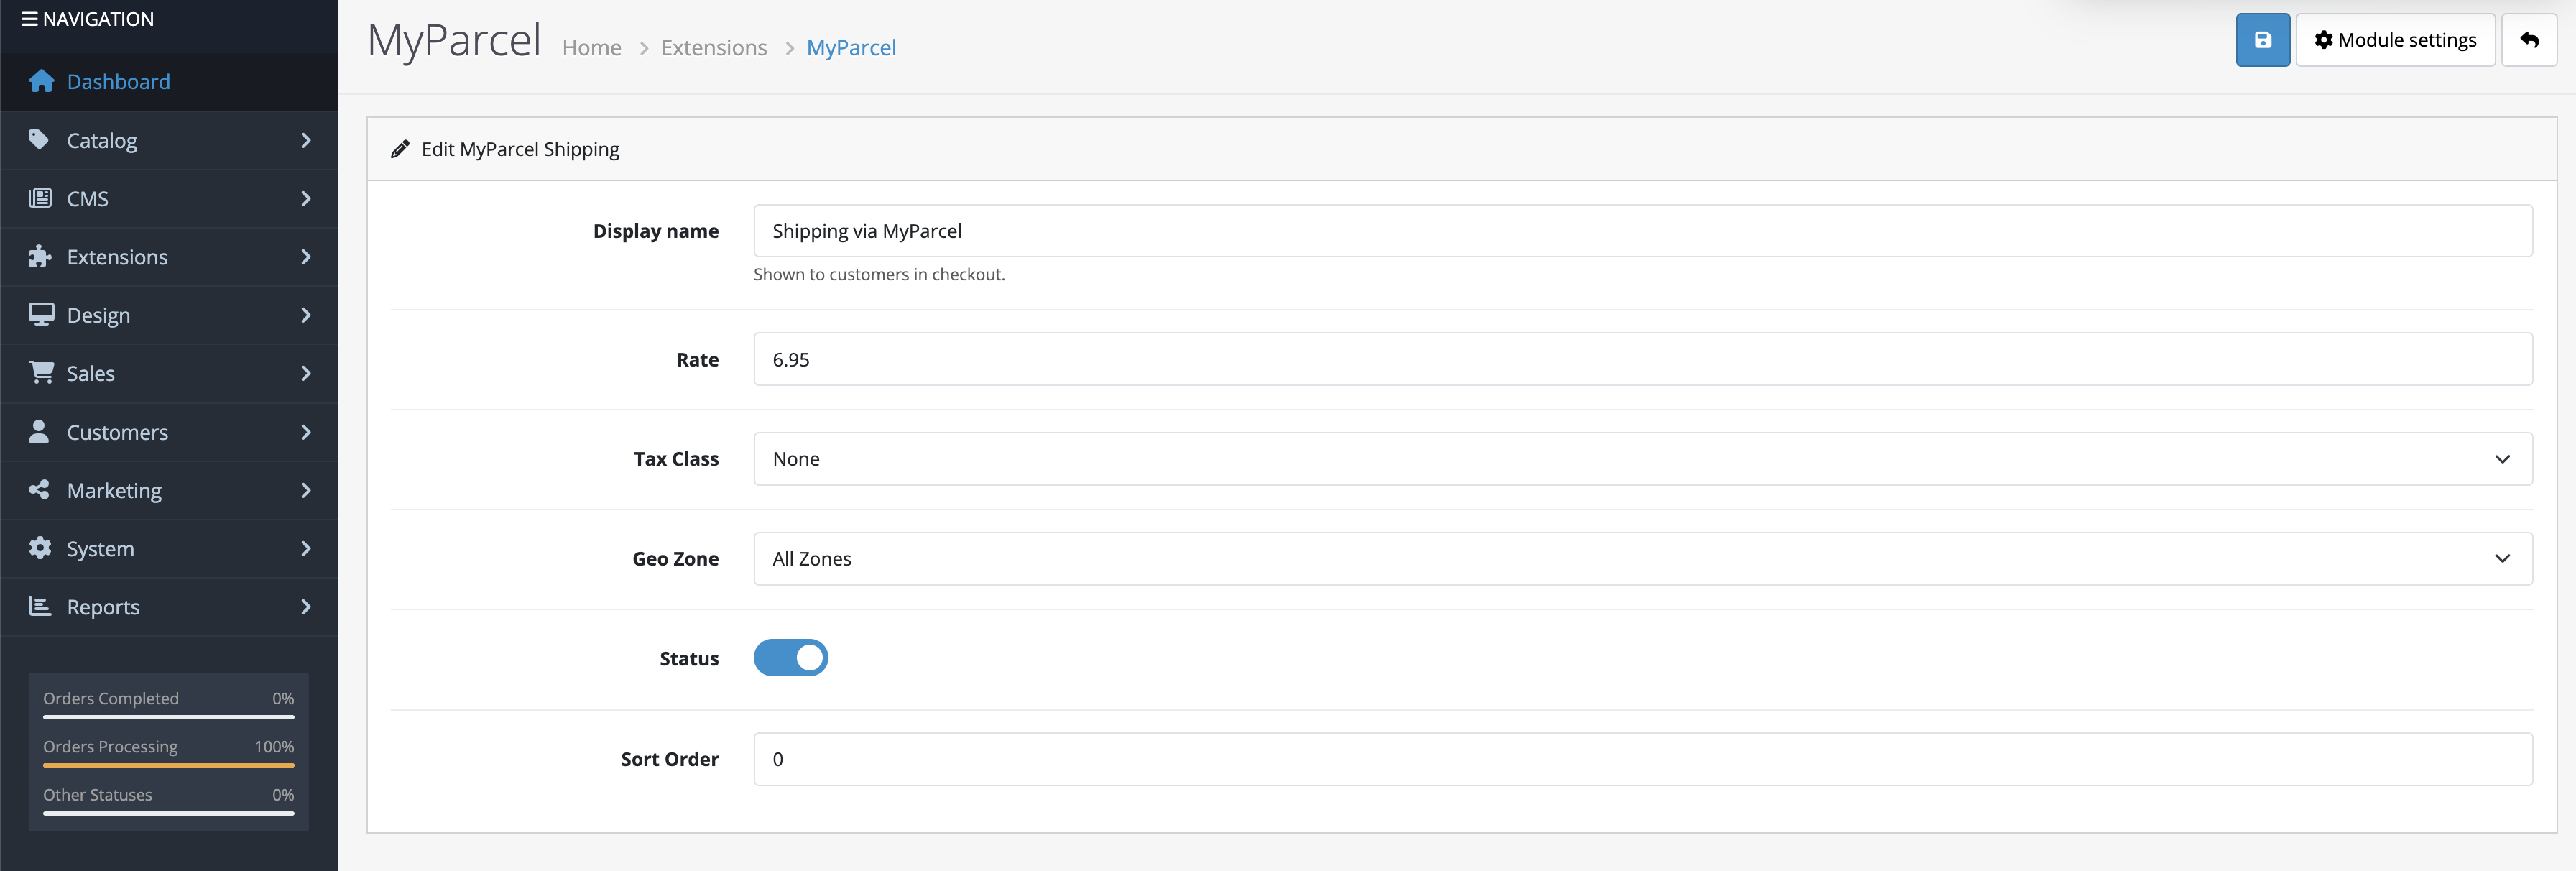
- Shipping method (Extensions → Extensions → Shipping → MyParcel) is what your customer picks and pays for in the checkout. Here you set the Display name shown to customers, the Rate, the Tax Class, the Geo Zone it applies to, its Status and Sort Order.
- Module (Extensions → Extensions → Modules → MyParcel) is the control centre: API key, carriers, checkout behaviour, customs and label defaults. This is where you spend most of your time.
You can jump between the two with the Shipping settings and Module settings buttons at the top right of each screen.
5 · Settings · General
On the Module → General tab:
| Setting | What it does |
|---|---|
| Status | Turns the whole MyParcel module on or off. |
| API key | The key from your MyParcel backoffice. Use the eye icon to reveal it and Test API key to verify it. |
| Environment | Production for real shipments (the default), or Acceptance (test) to test against the MyParcel test environment. |
6 · Settings · Shipment defaults
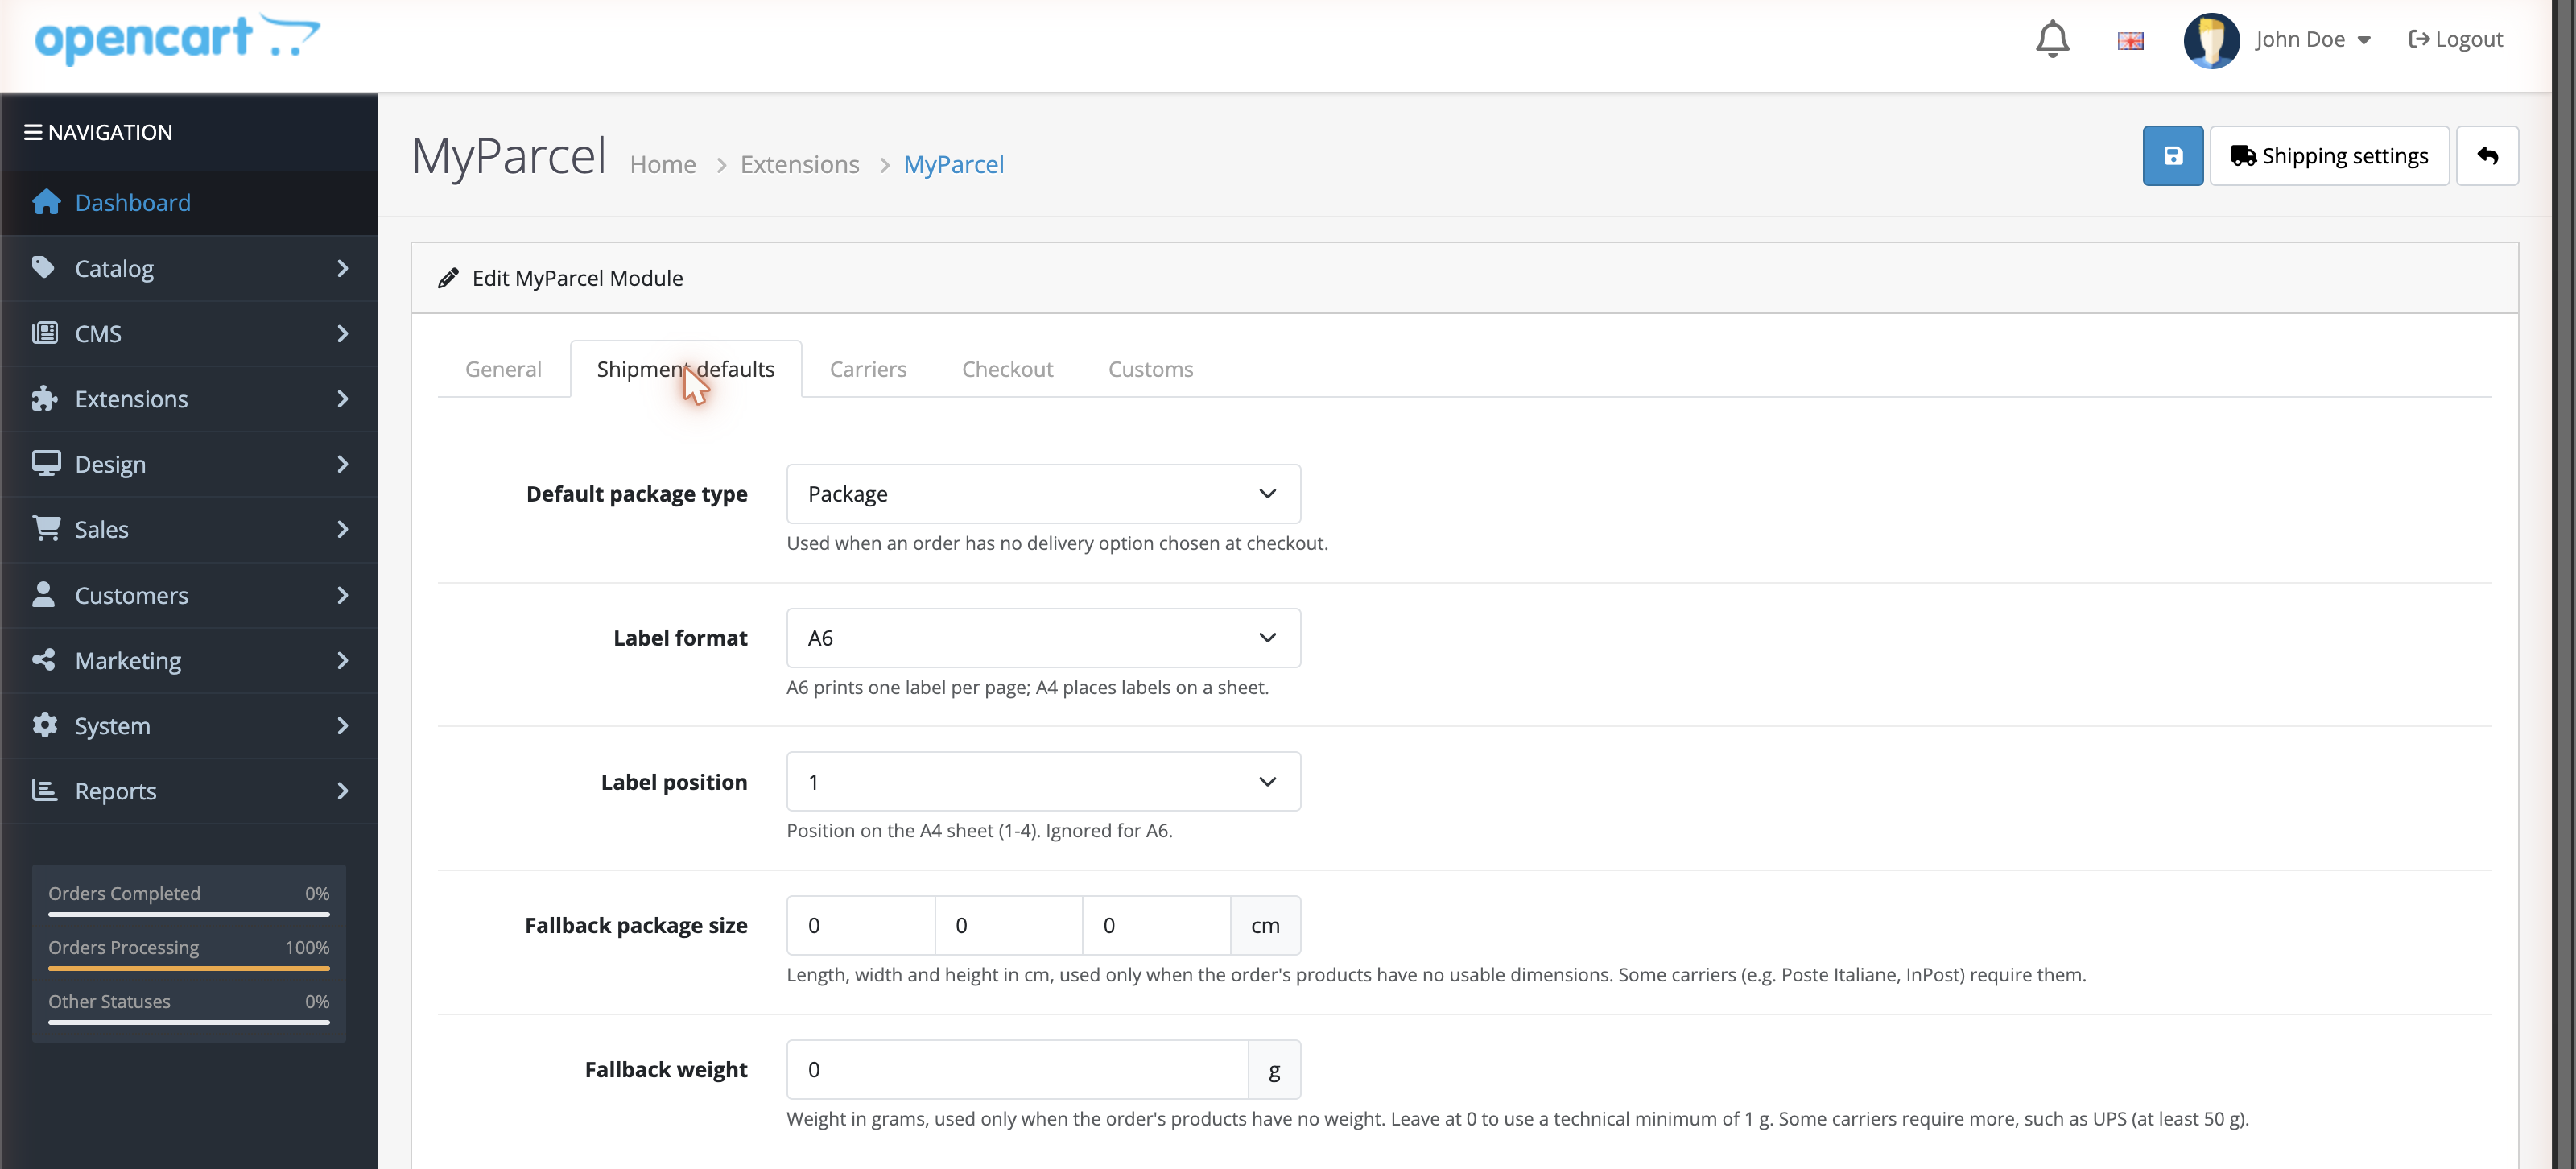
These values are used when an order does not carry its own data. On the Shipment defaults tab:
| Setting | What it does | Recommended |
|---|---|---|
| Default package type | The package type used when an order has no delivery option chosen at checkout. | Package |
| Label format | A6 prints one label per page. A4 places labels on a sheet. | A6 |
| Label position | Position on the A4 sheet (1 to 4). Ignored for A6. | 1 |
| Fallback package size | Length, width and height in cm, used only when the order's products have no usable dimensions. Some carriers (for example Poste Italiane and InPost) require them. | Fill in for parcel-locker carriers |
| Fallback weight | Weight in grams, used only when the order's products have no weight. Leave at 0 to use a technical minimum of 1 g. Some carriers require more, such as UPS (at least 50 g). | Leave at 0 unless a carrier needs more |
7 · Settings · Carriers
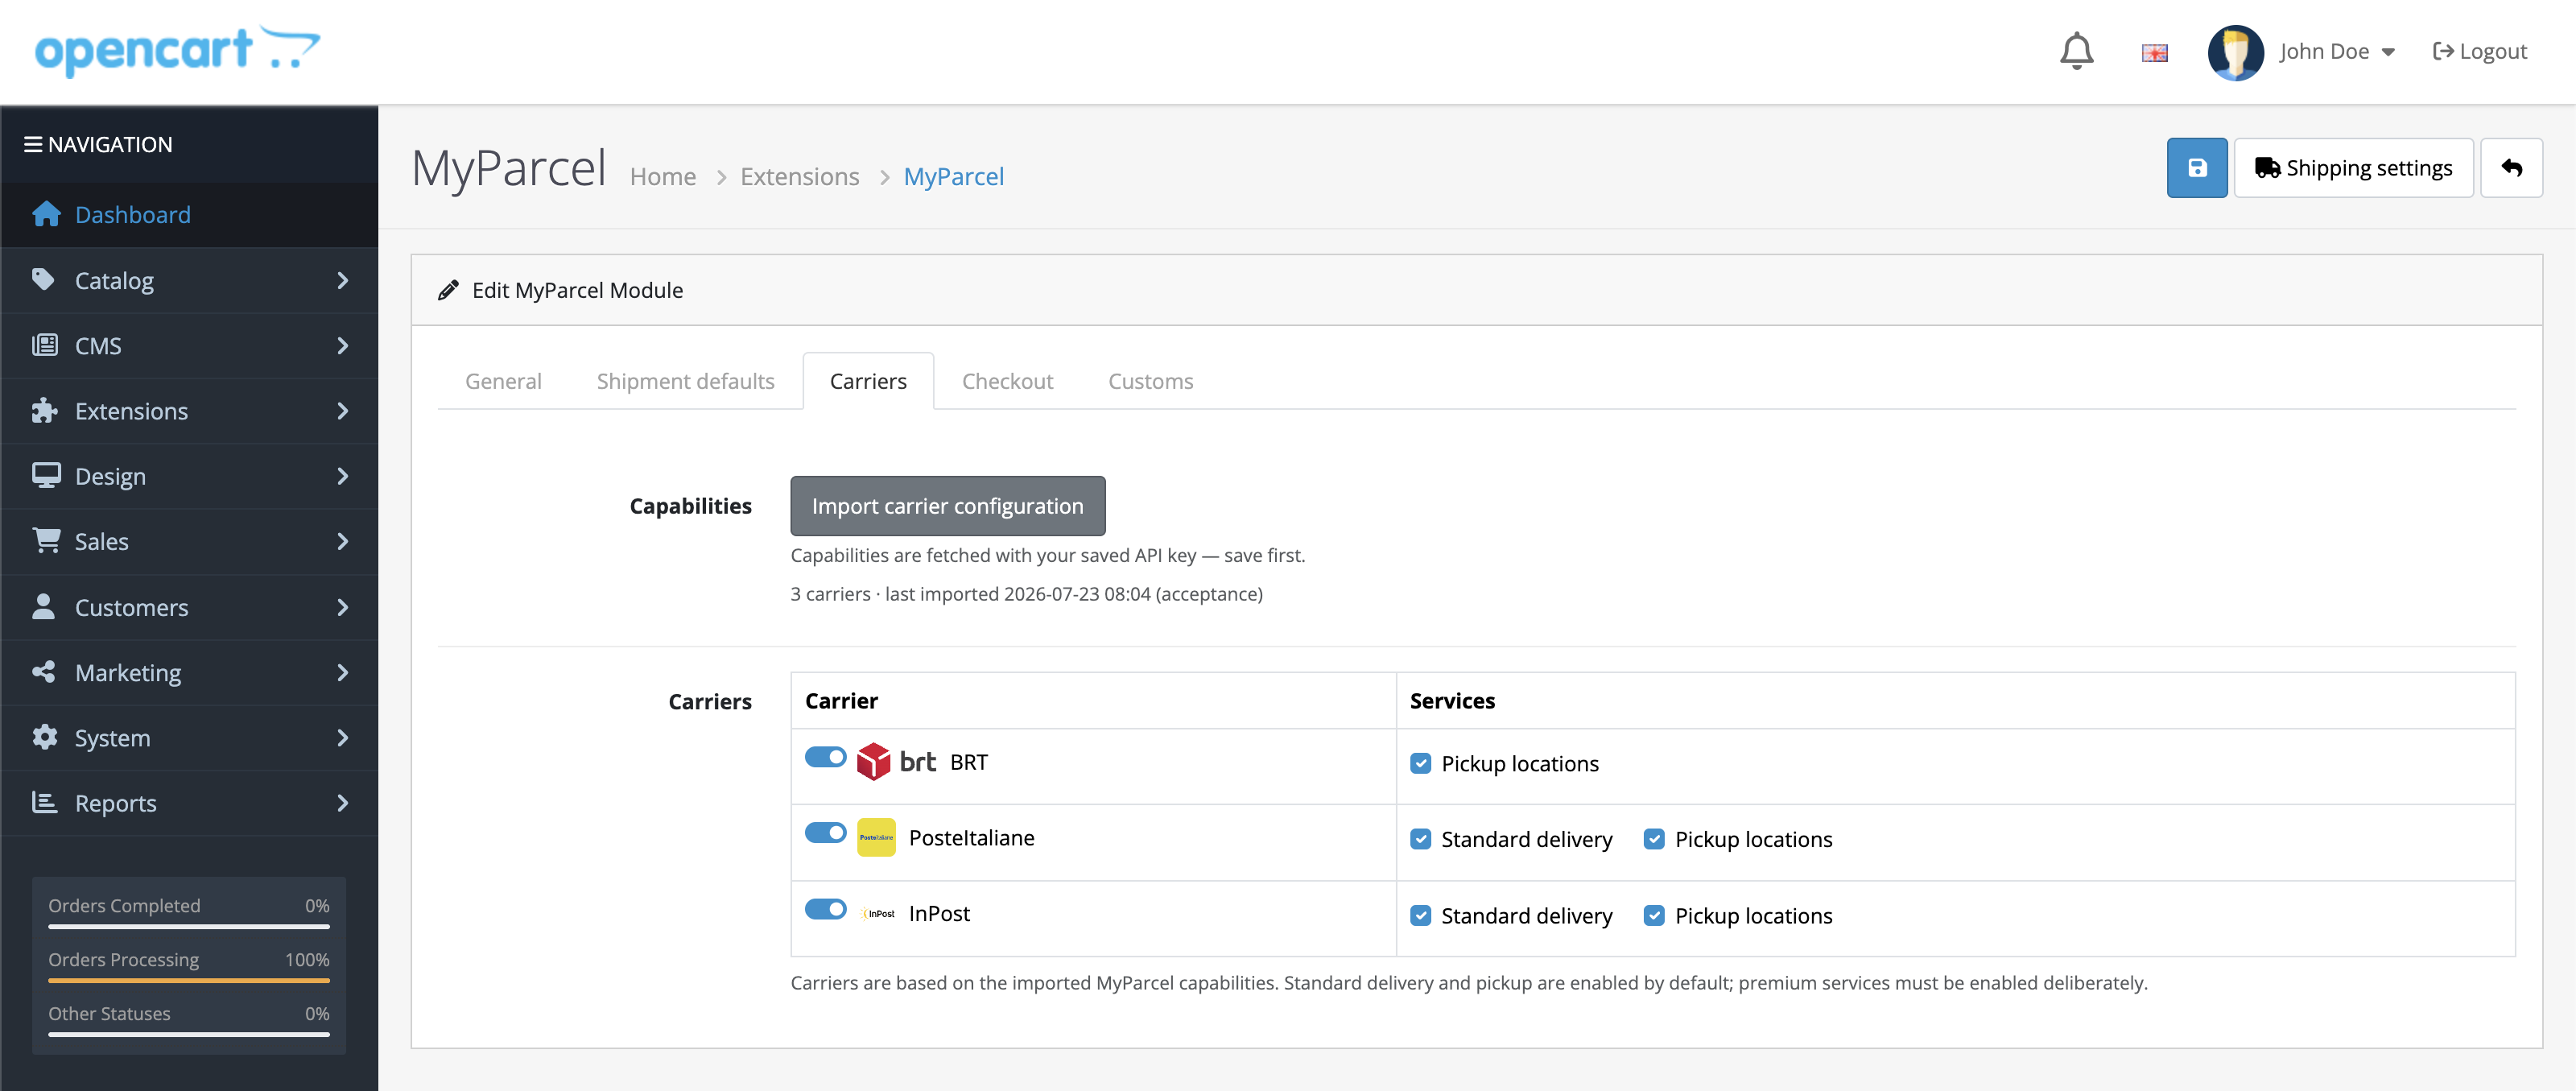
The Carriers tab reflects the carriers that are active on your MyParcel account.
- Click Import carrier configuration to fetch your carriers. Save your API key first, capabilities are fetched with the saved key. The screen shows how many carriers were imported and when.
- Each carrier has an on/off toggle. Turn on the carriers you want to offer.
- Per carrier, enable the Services you want, such as Standard delivery and Pickup locations. Standard delivery and pickup are enabled by default, premium services must be enabled deliberately.
Which carriers appear?
Only carriers that are active on your MyParcel account can be imported. If a carrier is missing, activate it in the backoffice first, then import again.
8 · Settings · Checkout
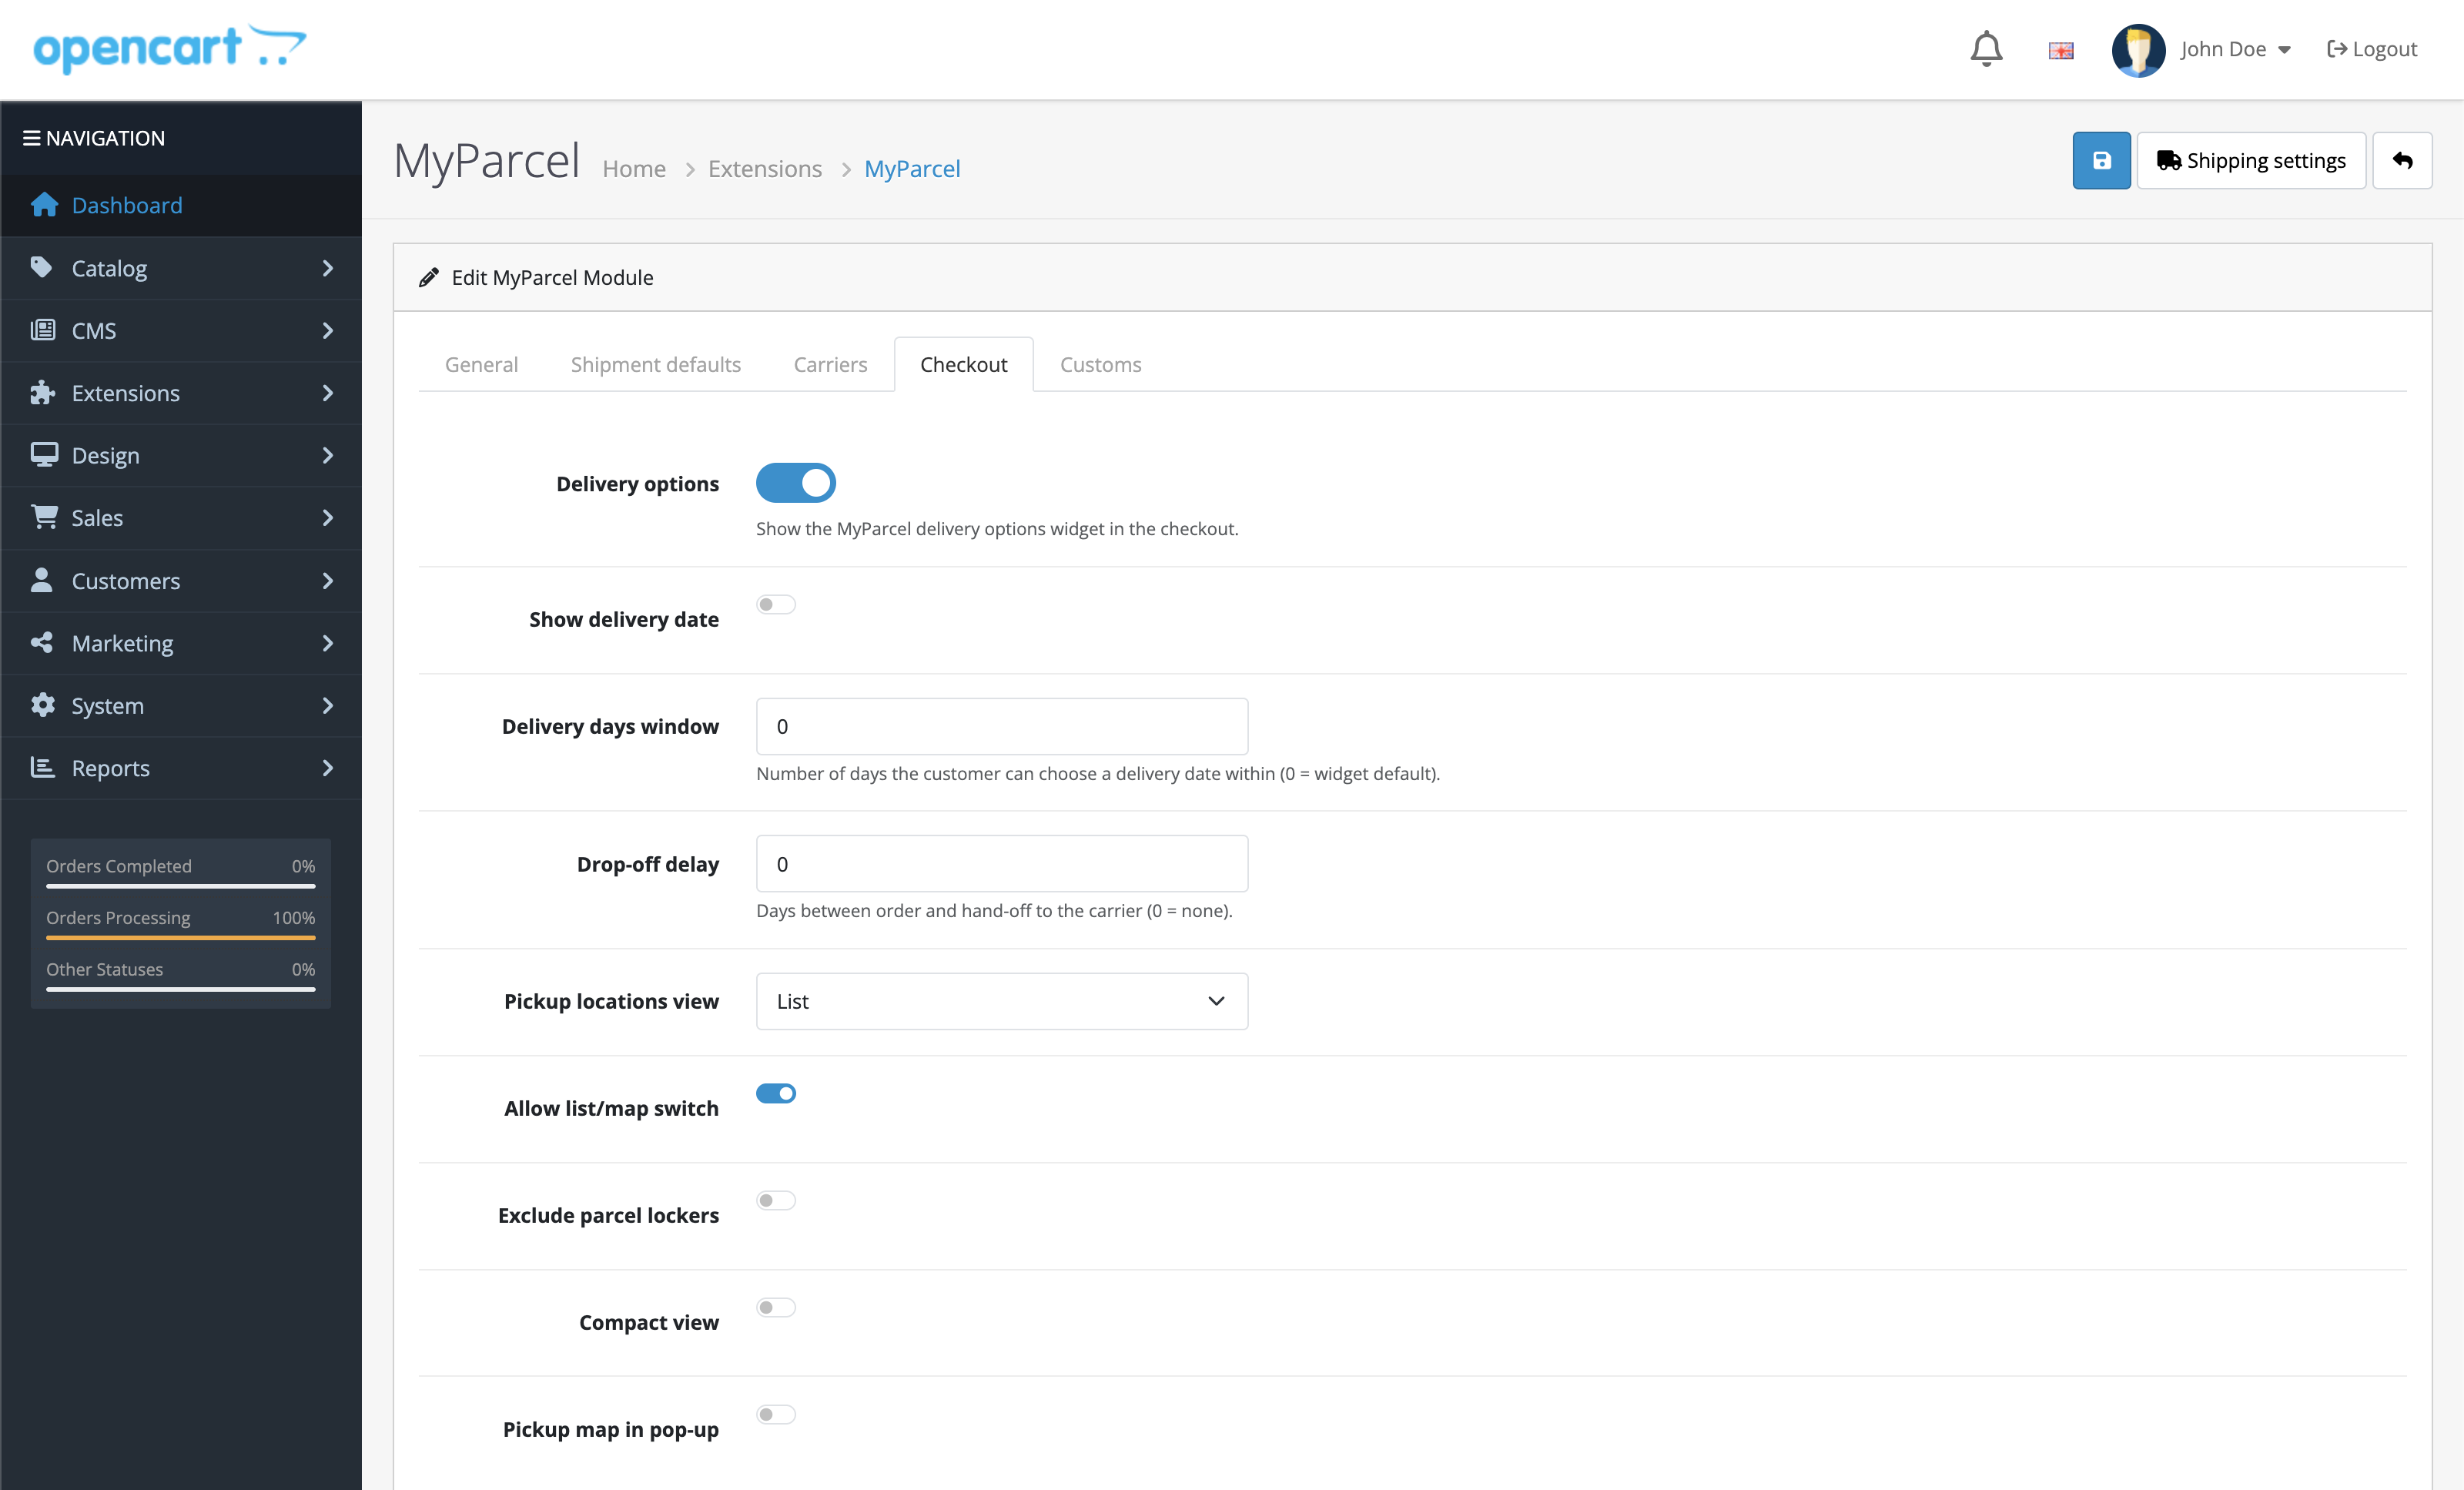
The Checkout tab controls the MyParcel delivery options widget that customers see. On the Checkout tab:
| Setting | What it does |
|---|---|
| Delivery options | Shows the MyParcel delivery options widget in the checkout. Turn this off to sell without delivery options. |
| Show delivery date | Lets the customer pick a delivery date. |
| Delivery days window | Number of days ahead the customer can choose a delivery date within (0 = widget default). |
| Drop-off delay | Days between the order and hand-off to the carrier (0 = none). Raise it if you need extra time to pack. |
| Pickup locations view | Show pickup points as a List or a Map. |
| Allow list/map switch | Lets the customer switch between the list and map view themselves. |
| Exclude parcel lockers | Hides automated parcel lockers from the pickup options. |
| Compact view | A denser layout for the widget. |
| Pickup map in pop-up | Opens the pickup map in a pop-up instead of inline. |
9 · Settings · Customs
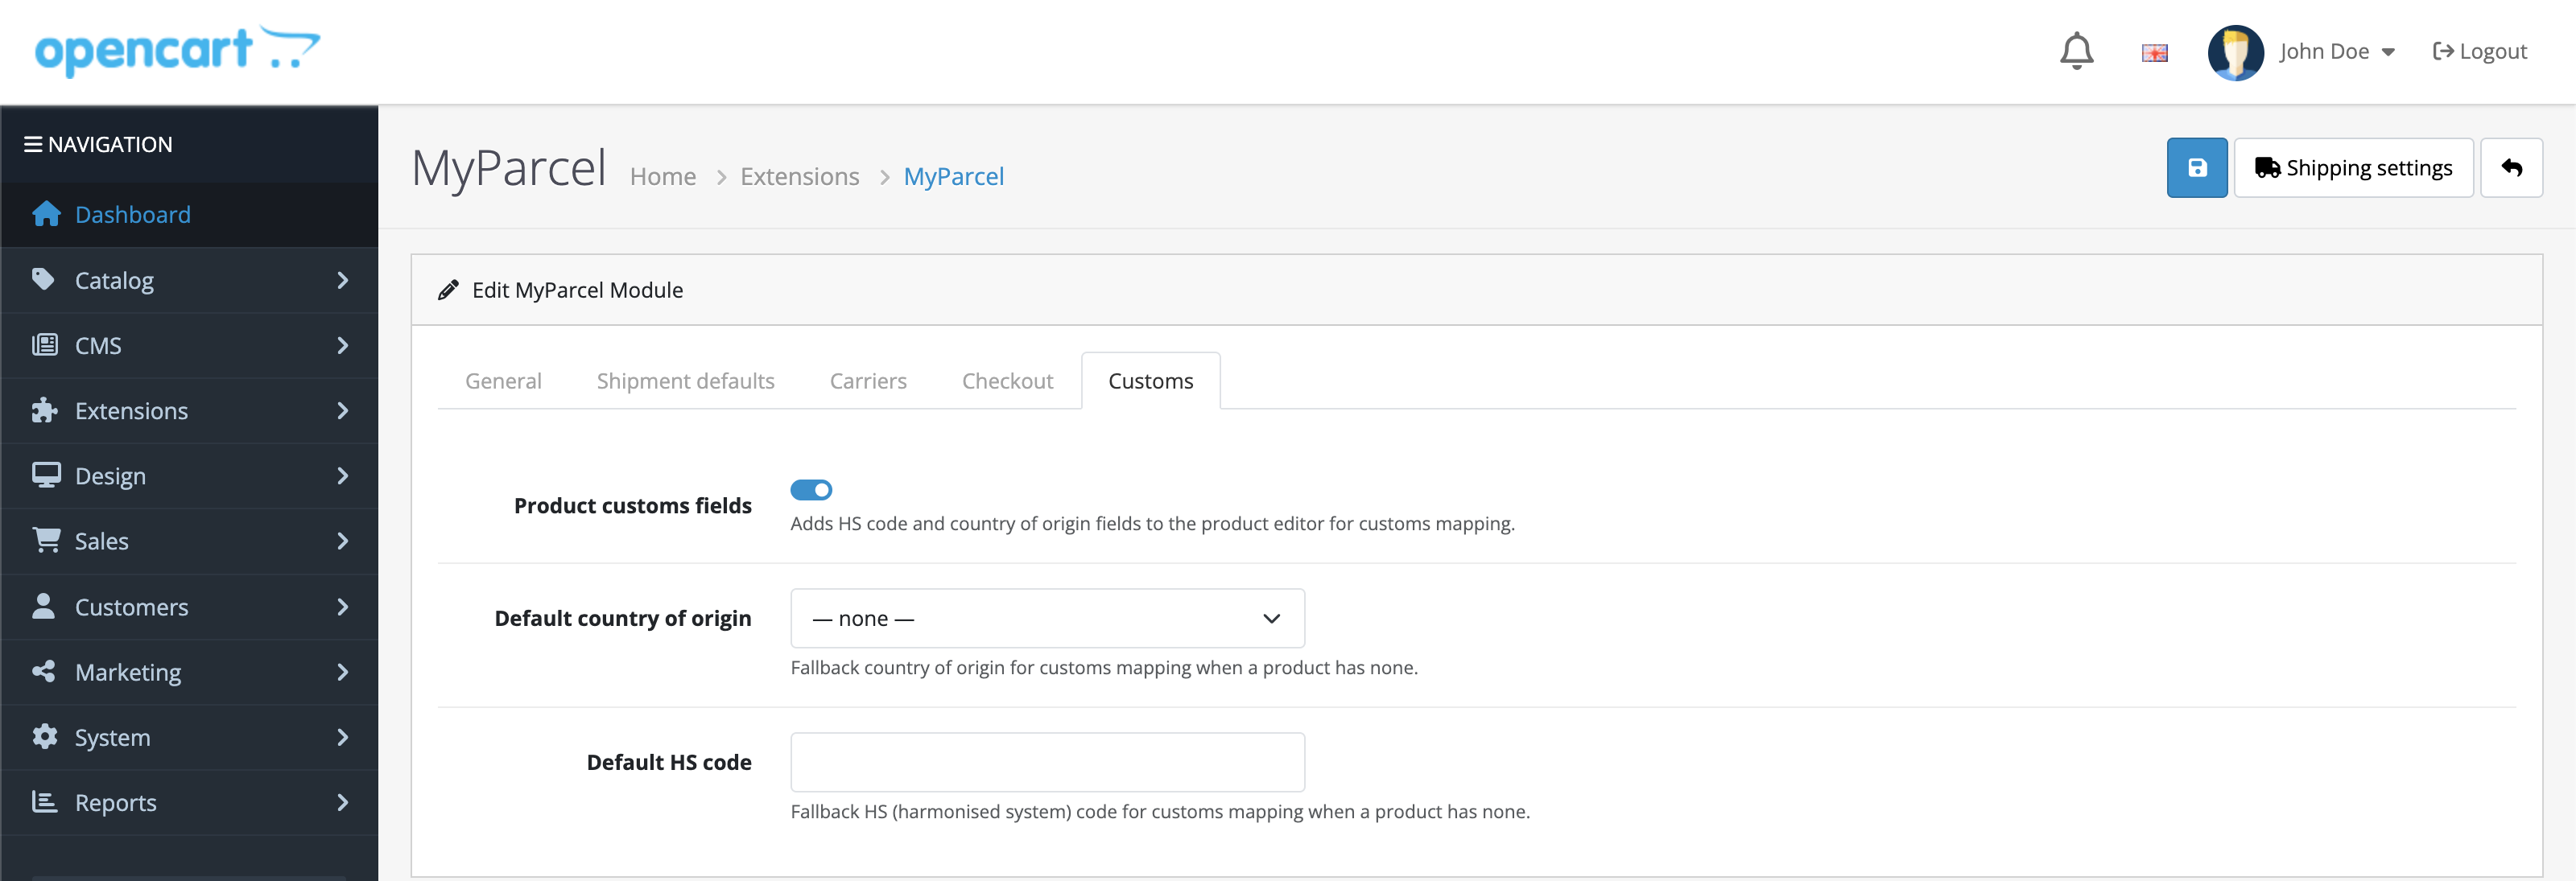
Needed when you ship outside the EU. On the Customs tab:
| Setting | What it does |
|---|---|
| Product customs fields | Adds HS code and Country of origin fields to the product editor for customs mapping (see 10 · Product settings). |
| Default country of origin | Fallback country of origin used for customs mapping when a product has none. |
| Default HS code | Fallback HS (harmonised system) code used for customs mapping when a product has none. |
10 · Product settings
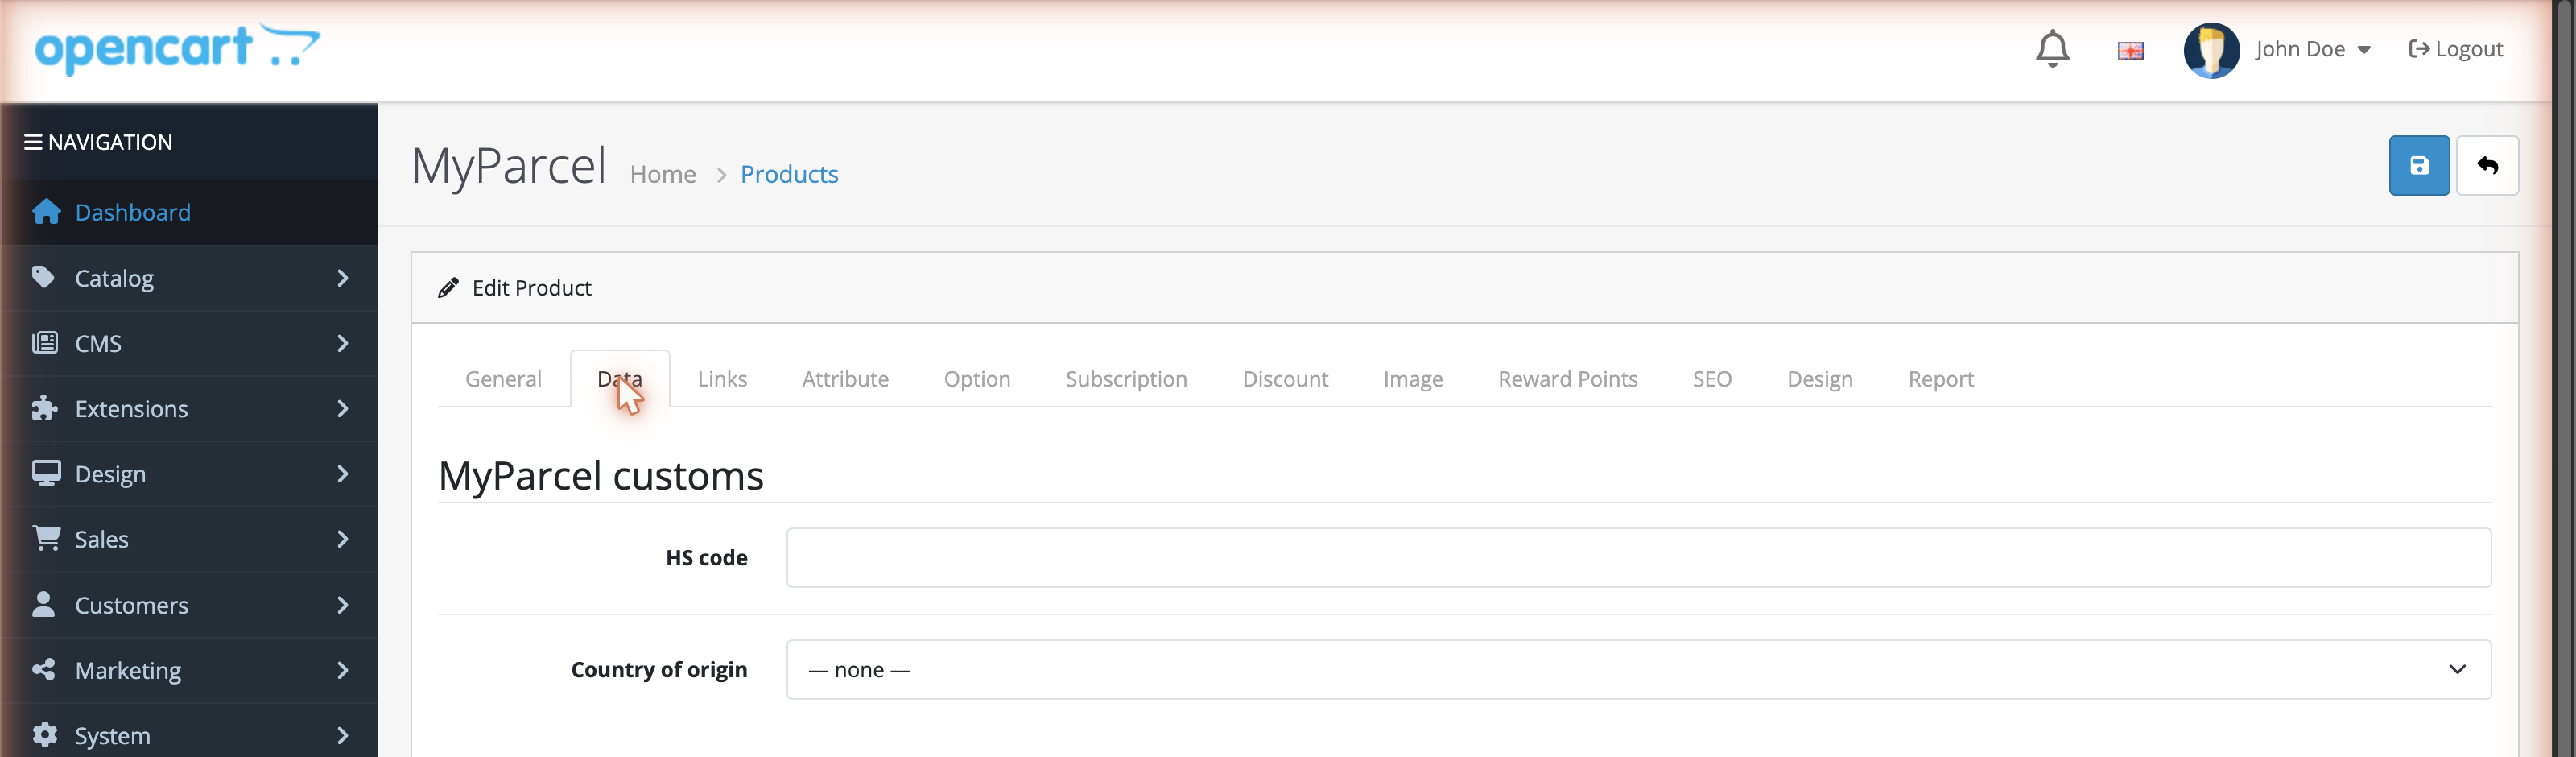
When Product customs fields is enabled, a MyParcel customs section appears at the top of a product's Data tab (Catalog → Products → edit a product → Data).
- HS code, the harmonised system code for this product.
- Country of origin, where the product was made.
MyParcel also uses the standard OpenCart Dimensions (L x W x H) and Weight from the same Data tab to calculate the shipment. Fill these in for accurate labels, they fall back to the values from Shipment defaults when empty.
11 · The orders list
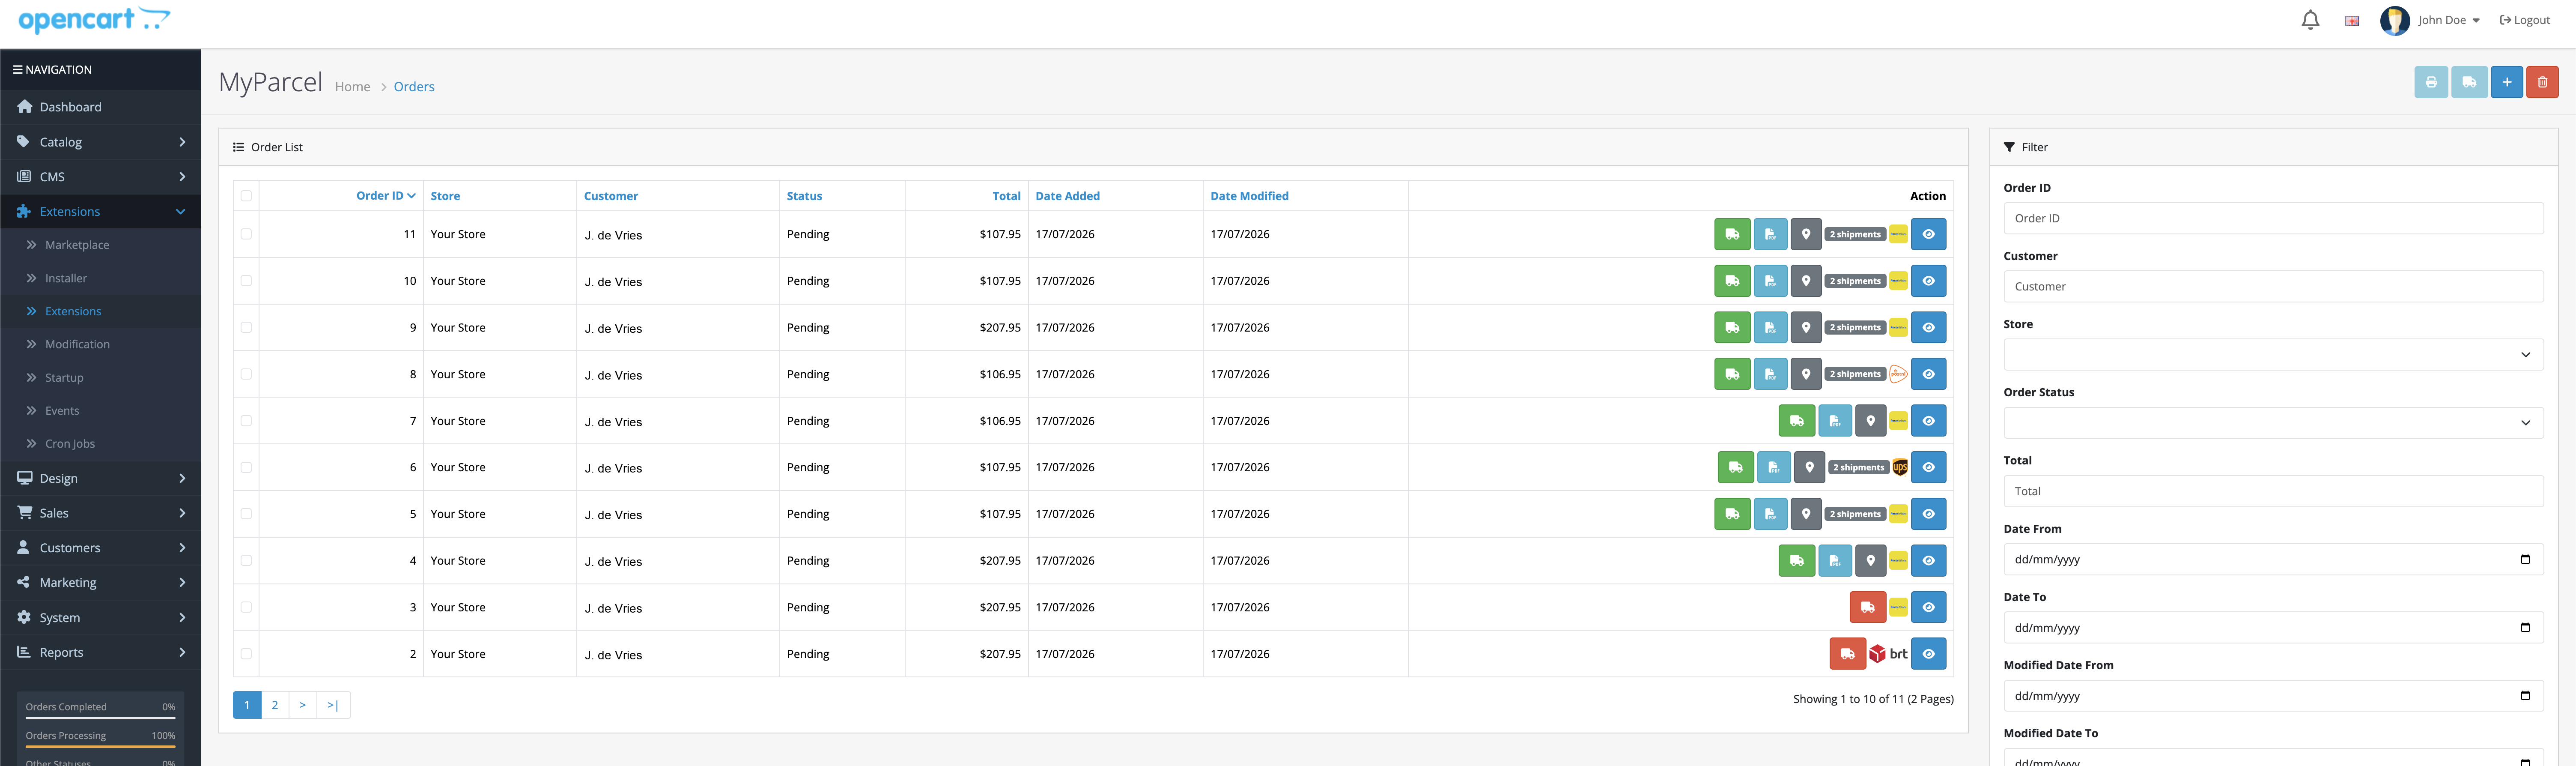
Open Sales → Orders. The MyParcel extension adds action buttons to each order row:
| Button | What it does |
|---|---|
| Green truck | Export the order to MyParcel and create a shipment (a concept shipment). |
| Blue PDF | Download the shipping label for the newest shipment. |
| Grey pin | Show the pickup location the customer chose, if any. |
| Shipment / carrier badge | Shows how many shipments the order has and the carrier. |
| Blue eye | Open the standard OpenCart order detail page. |
The toolbar at the top right offers the same actions in bulk for selected orders.
12 · The order detail page
Open an order (the blue eye button). At the top you'll find the MyParcel shipments panel.
- Every export creates a separate shipment, an order can have several. The toolbar actions use the newest shipment, the actions in the table act on a specific shipment.
- Each row shows the Shipment number, the Barcode, the Tracking status (for example Not available yet or Ready), the Created time and per-shipment actions to download the label and view the pickup location.

Multiple parcels for one order
Click the export button again to create an extra, independent shipment for the same order, handy when an order ships in more than one box.
13 · The checkout experience
With Delivery options enabled, customers see the MyParcel widget in the checkout after they enter their address. They can choose between the carriers and services you enabled on the Carriers tab.
Depending on the carrier and your settings, a customer can pick:
- Standard delivery, delivery to the address.
- Priority delivery or other premium services, when enabled for the carrier.
- A Pickup location, a nearby pickup point, shown as a list or on a map. Pickup points can carry an Eco-friendly label.
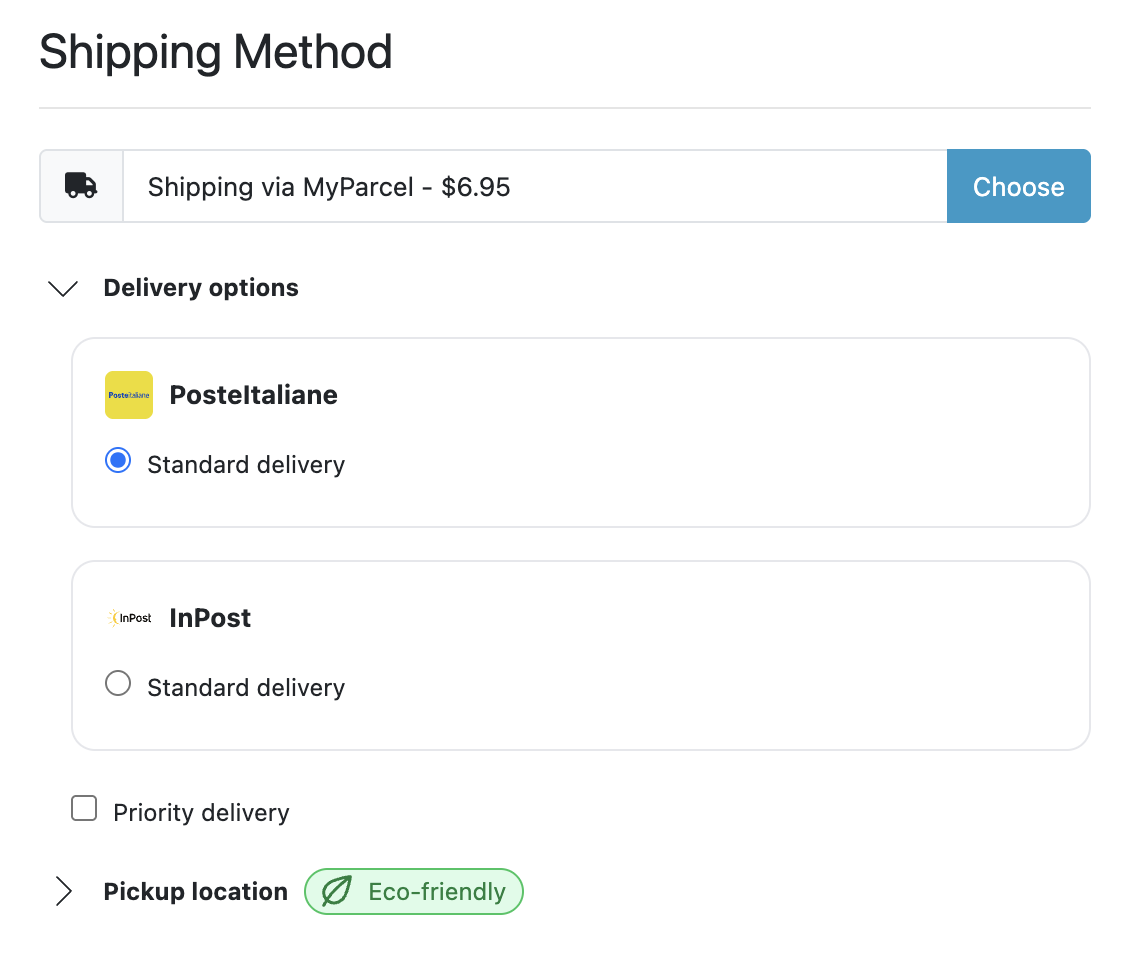
The customer's choice is passed to the order, so when you export it the correct carrier, service and pickup point are already filled in.
14 · Daily use
A typical shipping day:
- Open Sales → Orders and filter on new orders.
- Select the orders you want to ship and use the toolbar export button, or export them one by one with the green truck button.
- Download the labels (single PDF or in bulk) and print them.
- Hand the parcels to the carrier. Track & Trace is generated automatically and, where supported, shared with your customer.
15 · Something isn't working, diagnostics
| Symptom | Likely cause and fix |
|---|---|
| Test API key fails | Wrong or mistyped key, or the Environment does not match the key. Re-copy the key from the backoffice and check Production vs Acceptance. |
| No carriers on the Carriers tab | Save the API key first, then click Import carrier configuration. If a carrier is still missing, activate it in the MyParcel backoffice. |
| No delivery options in the checkout | The Delivery options toggle is off, the MyParcel Shipping method is disabled or outside its Geo Zone, or no carrier/service is enabled. |
| Export fails for a carrier that needs dimensions | Some carriers (Poste Italiane, InPost) need a package size. Fill in the product dimensions or a Fallback package size. |
| Label button does nothing | The shipment has no barcode yet (tracking shows Not available yet). Wait a moment and refresh, or re-export. |
| Settings or buttons look outdated after an update | Refresh the modifications cache under Extensions → Modifications → Refresh. |
16 · FAQ
Do I need both the Module and the Shipping method? Yes. The Shipping method is the rate customers pick in the checkout, the Module holds the API key, carriers and label handling. Install and enable both.
Where do I set the shipping price? On the MyParcel Shipping method (Extensions → Extensions → Shipping → MyParcel), in the Rate field.
Can one order have more than one parcel? Yes. Each export creates a separate, independent shipment. Export again to add another parcel to the same order.
Do I have to enter weights and sizes per product? It helps accuracy. When a product has no weight or dimensions, MyParcel uses the Fallback weight and Fallback package size from Shipment defaults. Some carriers require real dimensions.
Is my customer's pickup choice kept? Yes. The pickup point a customer selects in the checkout is stored on the order and used when you export it.